

Dark Souls: Remastered Boss Order With DLC – The Best Way To Complete The Game
The basics
Bosses
Progression
Have you started Dark Souls Remastered and don’t know what to do or are stuck on its challenging bosses? Well, after playing through the game several times and spending a few hundred hours playing, I’ve compiled the best possible Dark Souls Remastered boss order, which you can find below along with a checklist to keep track of which bosses you’ve defeated.
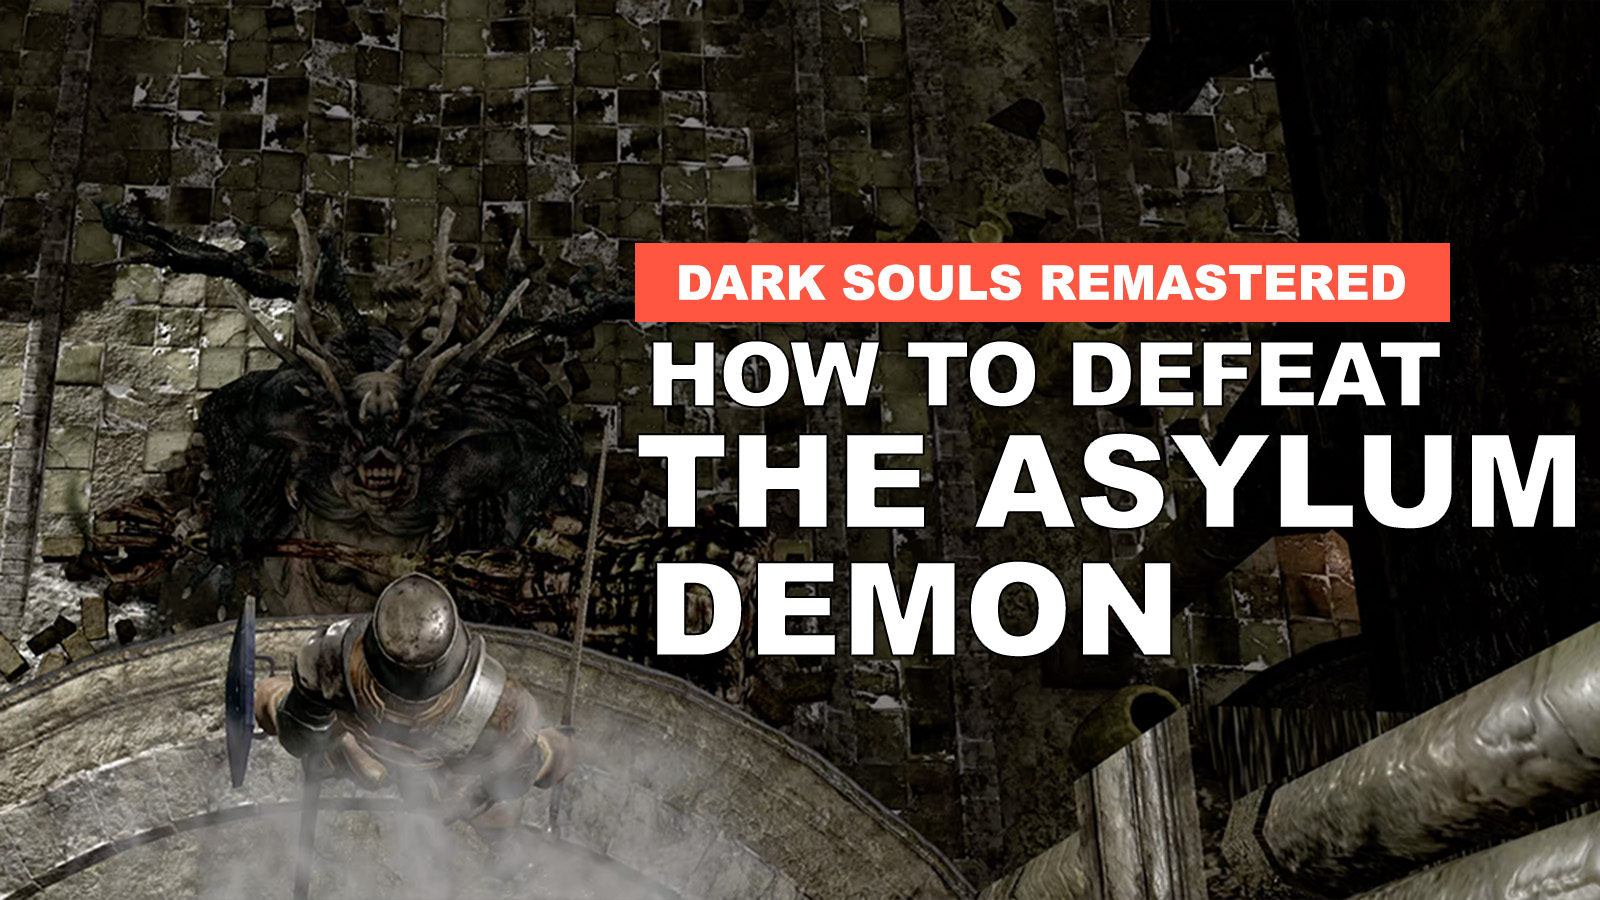
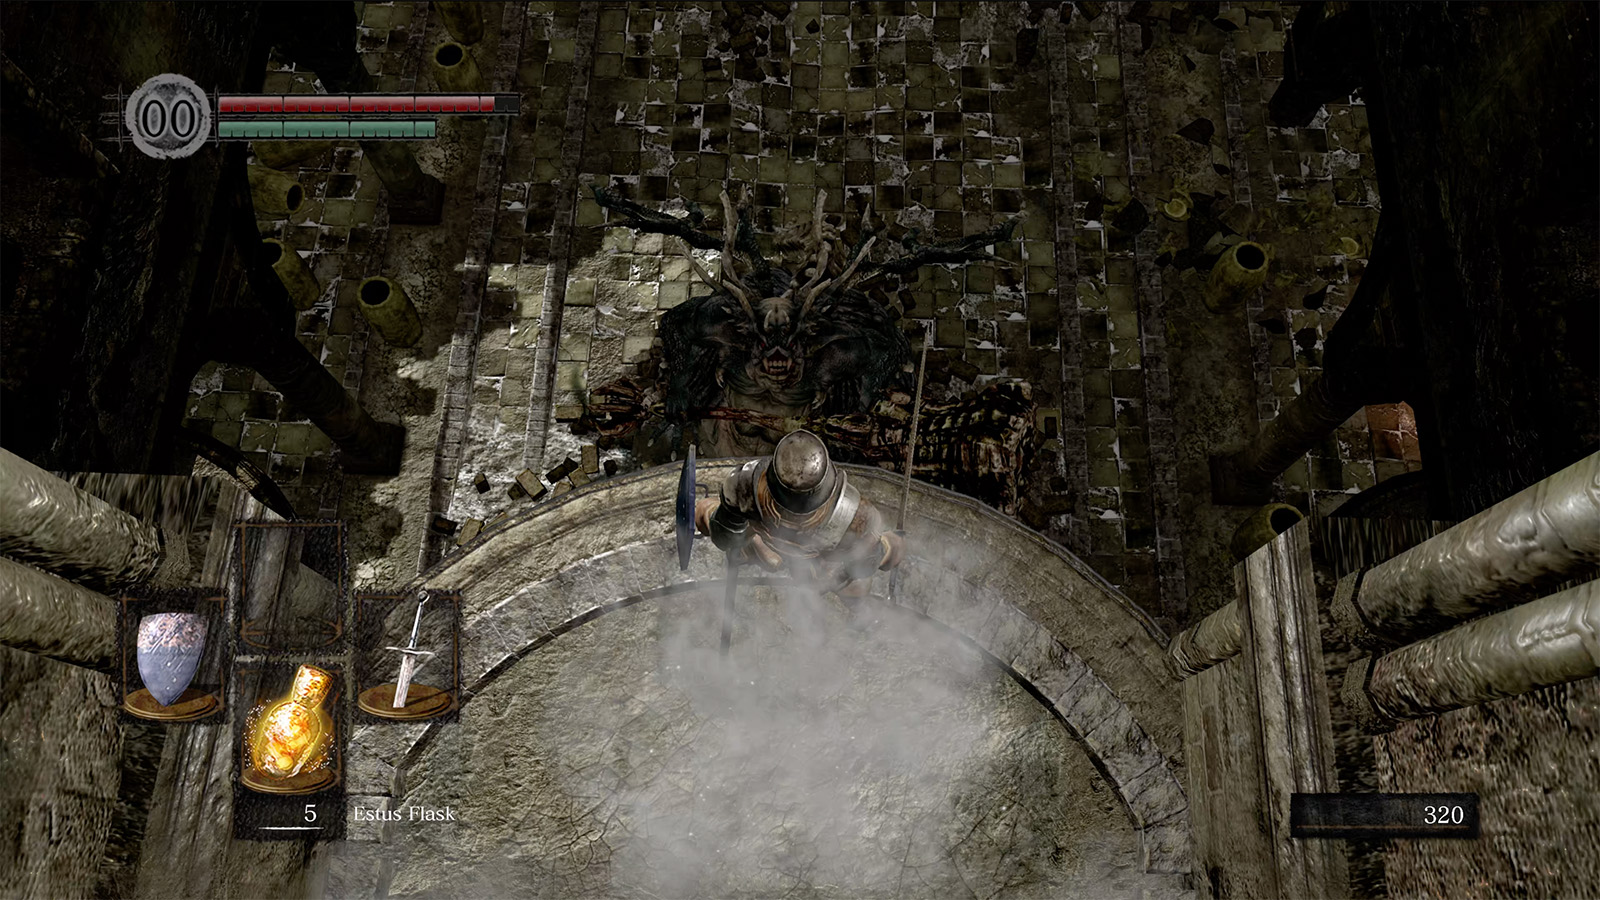
1. Asylum Demon
Rewards:
• 2,000 Souls
• 1 Humanity
• Big Pilgrim’s Key
• Demon’s Great Hammer (Rare)
Suggestion: How to defeat the Asylum Demon
The Asylum Demon is the first boss you’ll face in Dark Souls. There are two encounters. In the first, you’ll enter the boss room and the Asylum Demon will jump from the room above. Since you have weak weapons at this point in the tutorial, you should avoid it and instead run towards an open door to the left of the arena.
Continue through the area, and you’ll eventually reach the balcony it jumped from. You can perform a plunge attack with your stronger weapon to start the fight, and then continue the battle on the ground. He’s slow, his attacks are relatively easy to read, and you can avoid most of his attacks by circling his right, so the fight isn’t too difficult. Once defeated, head through the door at the back of his arena to leave the game’s tutorial area.
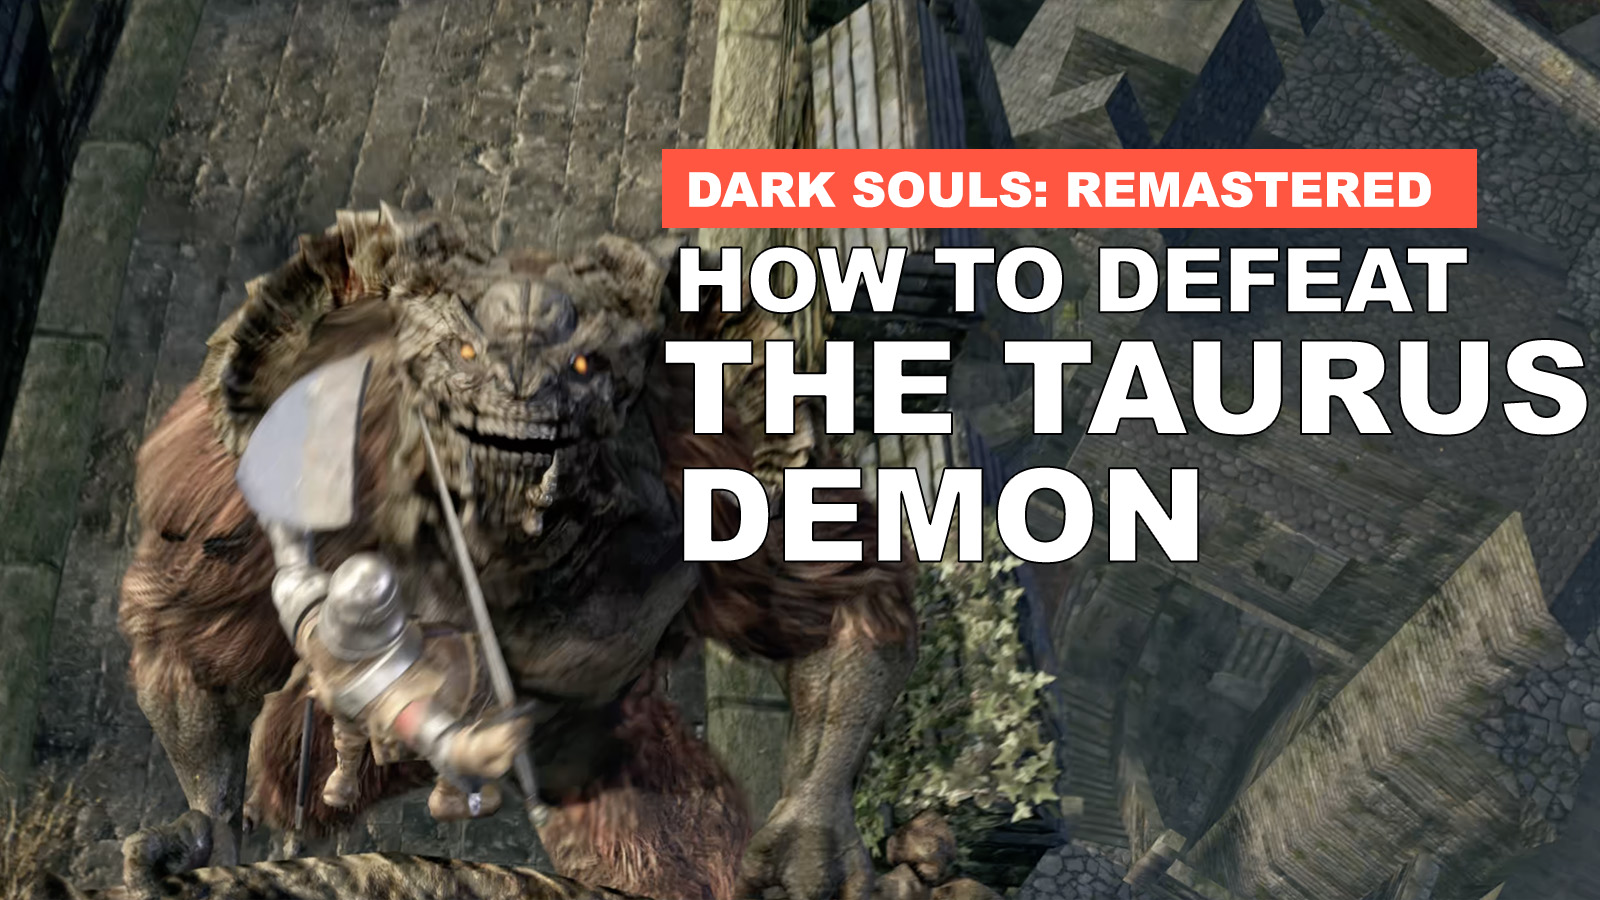
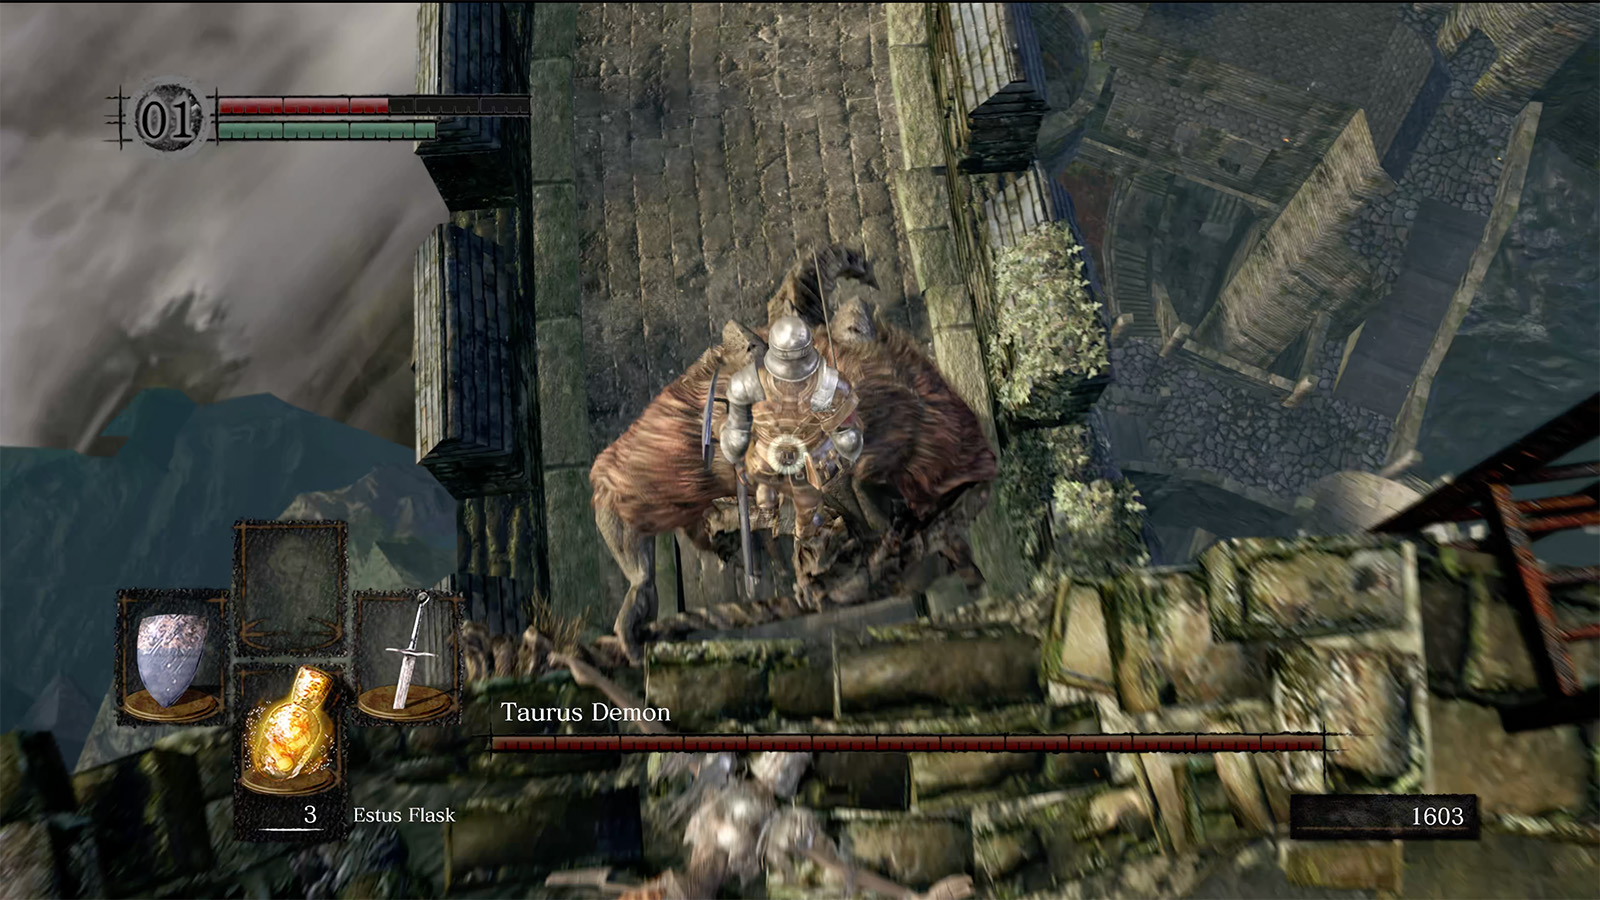
2. Taurus Demon
Rewards:
• 3,000 Souls
• 1 Humanity
• 1 Homeward Bone
• Demon’s Greataxe (Rare)
Worth reading: How to defeat the Taurus Demon
Once you’ve reached Firelink Shrine, head towards the Undead Burg by crossing the Aqueduct at Firelink Shrine. After progressing through the Undead Burg, you’ll eventually climb a tower to a castle walkway (Just after a Hollow pushes a flaming barrel down a staircase), and crossing it halfway triggers the Taurus Demon fight. Before you start the fight, make sure to turn around and climb to the top of the tower you emerged from to defeat two archers. If left, these guys will attack and stun you with bolts and arrows while you attempt to face the Taurus Demon.
The easiest way to defeat the Taurus Demon is by performing multiple plunge attacks off the tower’s rooftop and then fighting him head-on when you’re on the bridge. Just be careful with the broken segment, which you or the demon can fall from. He’s faster than the Asylum Demon and hits hard, so prioritise dodging or blocking with your shield, and don’t be afraid to use Gold Pine Resin as he’s weak to lightning damage! Once defeated, cross the wall and descend to the bottom of the nearby tower to a bridge. Walk along it and take the staircase on your right to unlock a shortcut to an earlier bonfire.
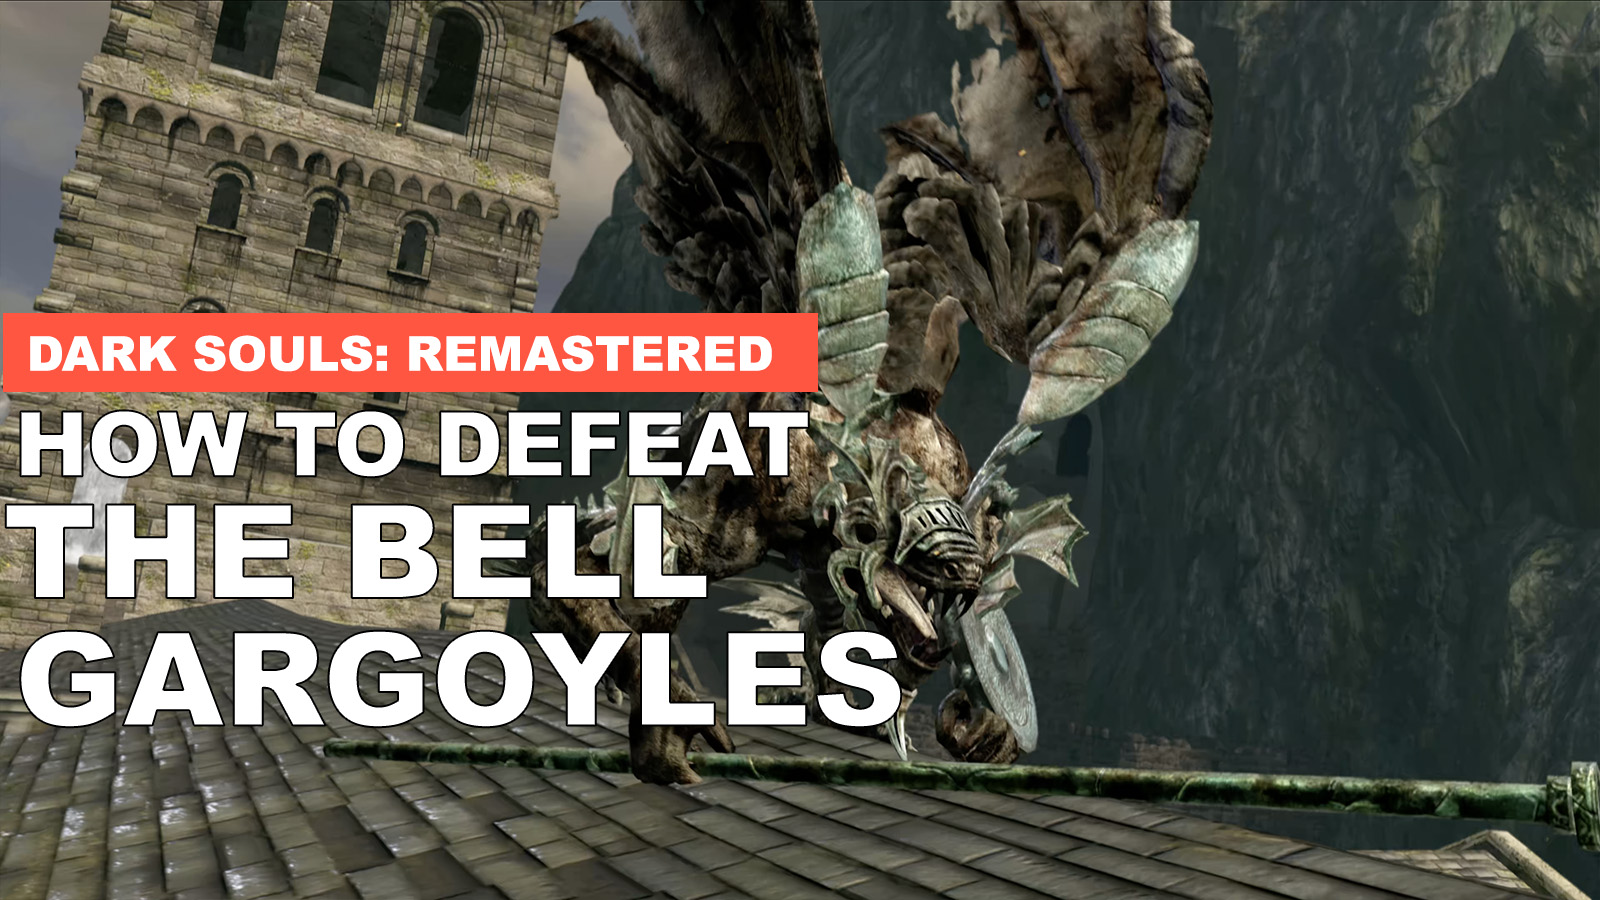
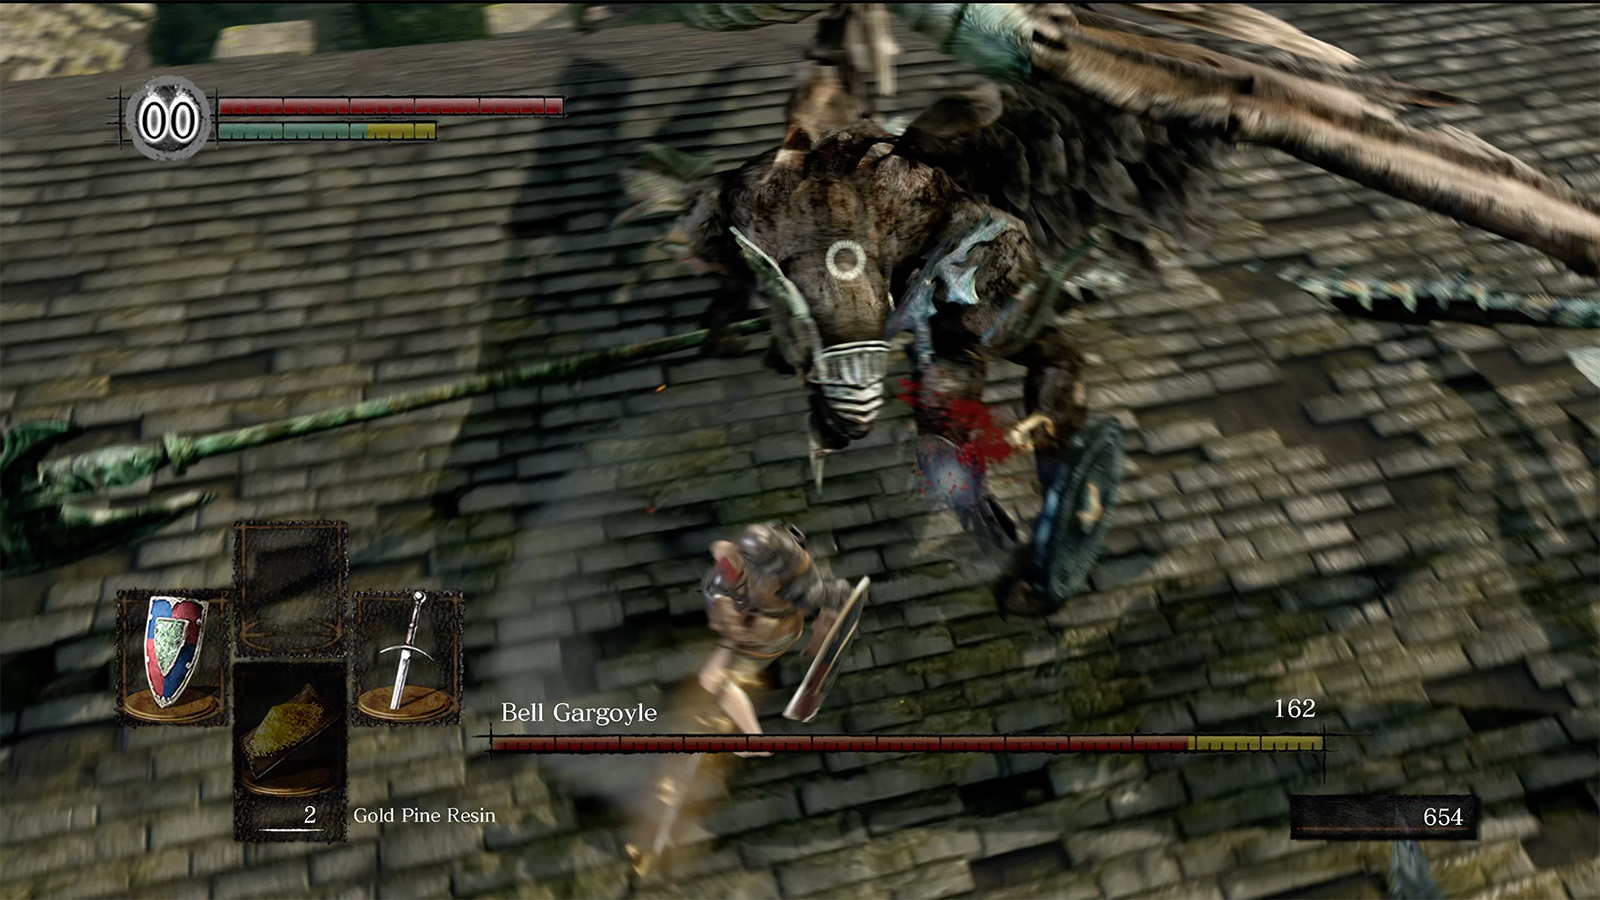
3. Bell Gargoyles
Rewards:
• 10,000 Souls
• 1 Twin Humanity
• Gargoyle’s Halberd
• Gargoyle Shield (Rare)
• Gargoyle Helm (Rare)
• Gargoyle Tail Axe (Cut off tail)
Check out: Bell Gargoyles boss guide
Once the Taurus Demon has been defeated, you’ll want to continue through the Undead Burg by crossing the bridge the dragon sits atop (Go under it!). Eventually, you’ll reach a large church opposite the building where Blacksmith Andre can be found at the Undead Parish. You’ll have to reach the top and defeat the Bell Gargoyles to ring the First Bell Of Awakening.
The Bell Gargoyles begins as a fight against a single Gargoyle, but inflicting enough damage awakens a second. The best strategy to go for in this fight is to inflict as much damage as possible on the first Gargoyle, and then to continue targeting it even after the second joins the fight. If you’re quick enough, you can defeat the first, leaving you with a relatively simple one-on-one fight with the second Gargoyle.
It’s worth noting that a majority of the attacks can be blocked, and the Gargoyles’ flame breath attacks can be avoided by running around the enemy. This attack also gives you ample time to attack or heal if needed. Try and wear some armour with good fire defence, and again, use some Gold Pine Resin for some strong lightning damage.
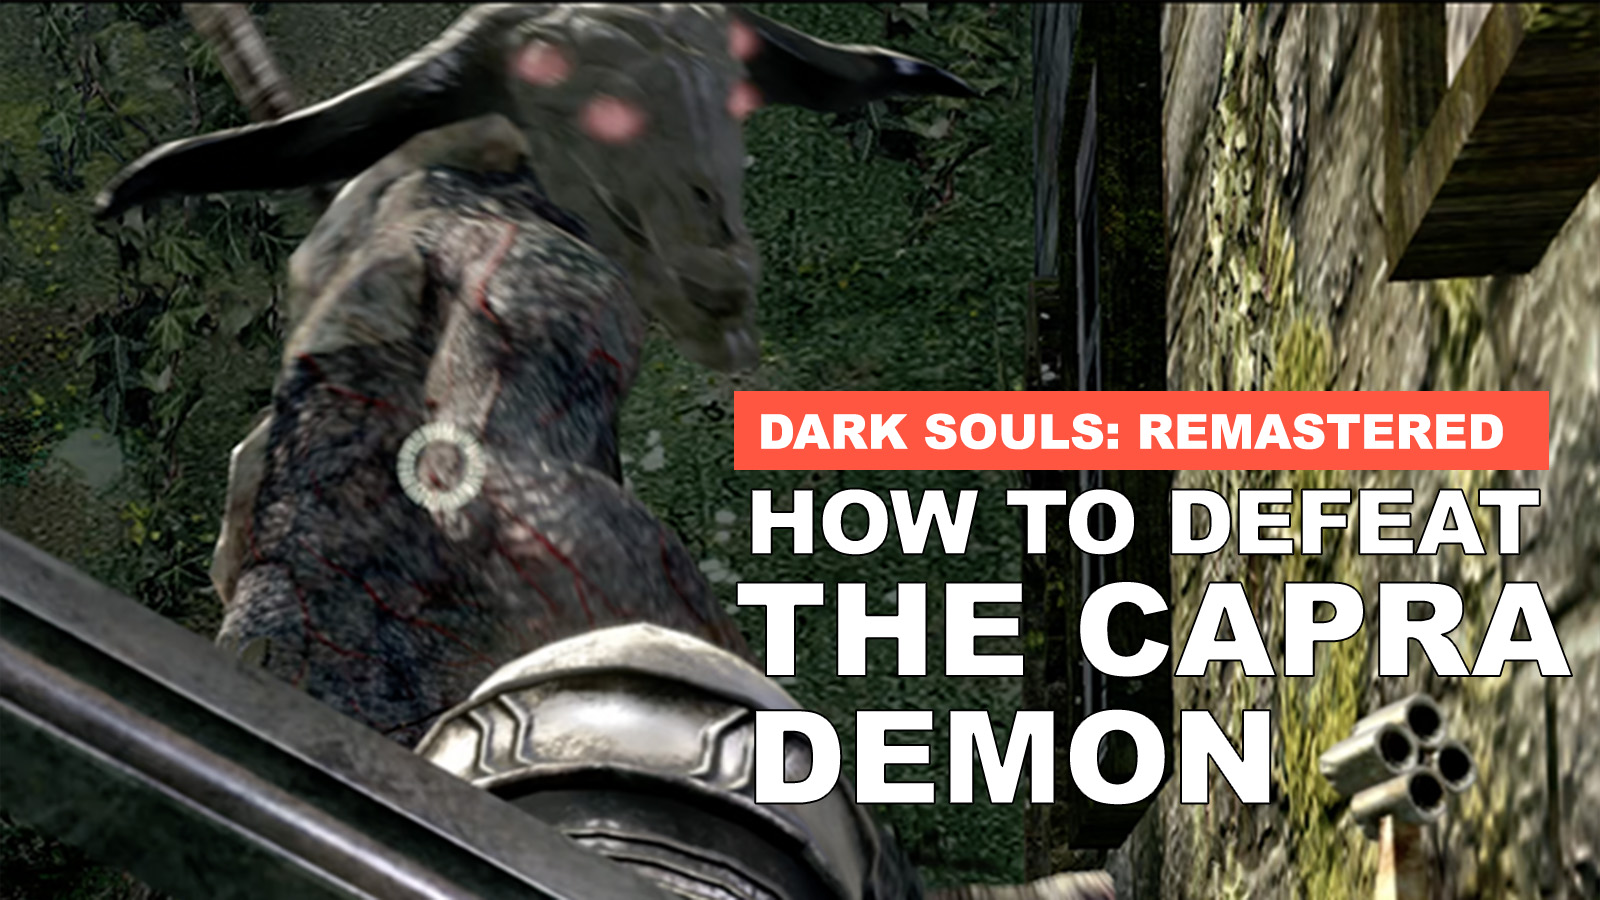
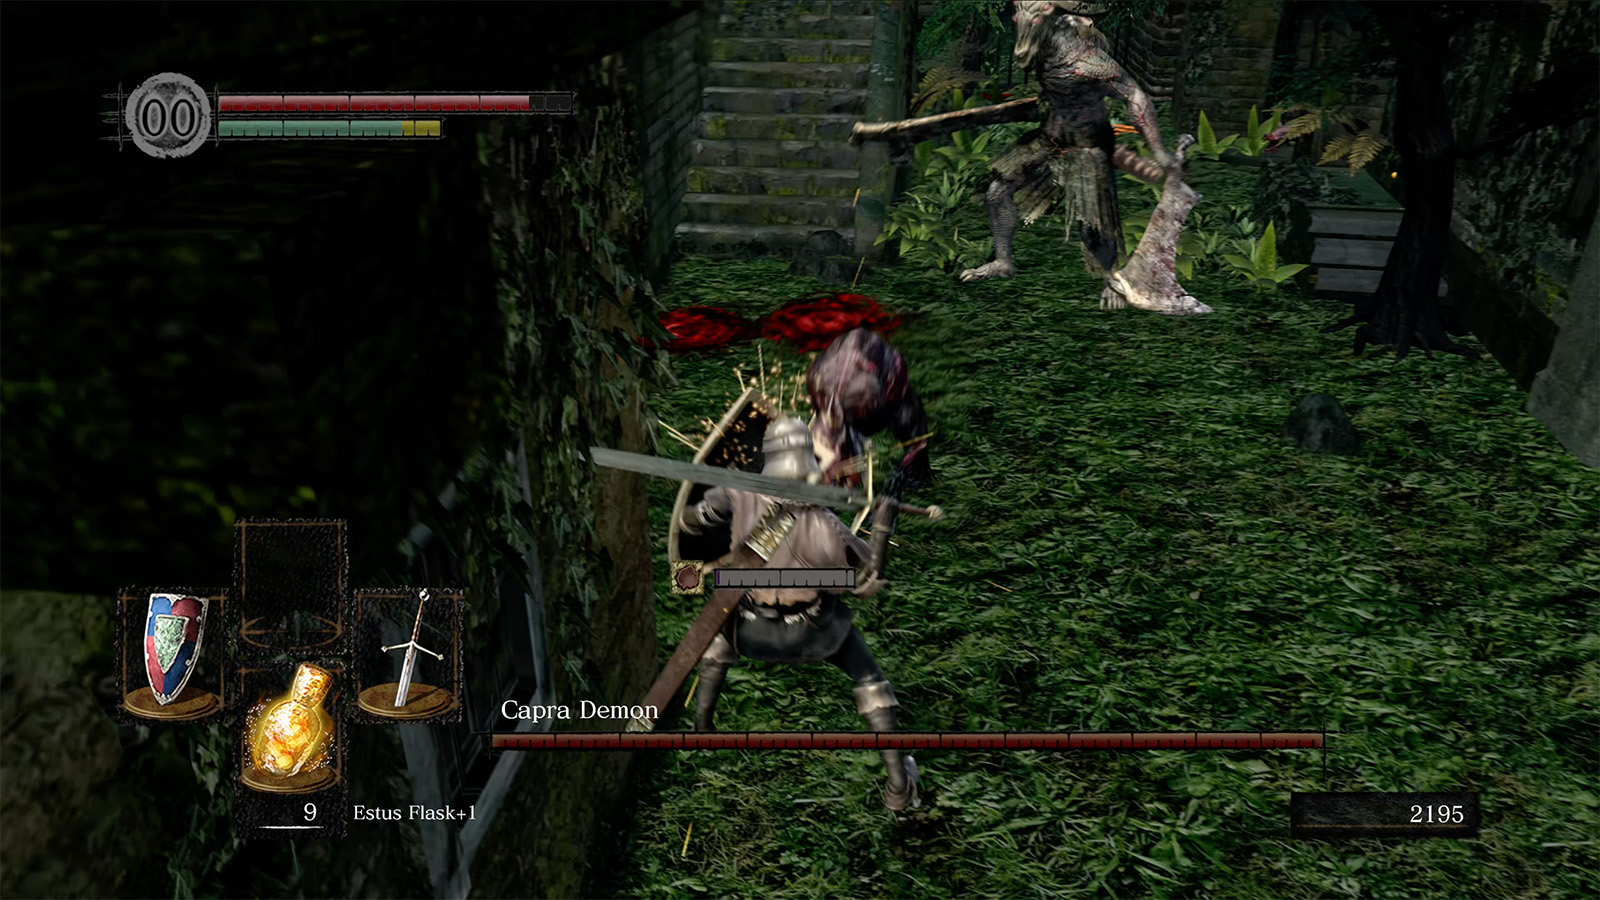
4. Capra Demon
Rewards:
• 6,000 Souls
• 1 Humanity
• 1 Homeward Bone
• Key To The Depths
• Demon Great Machete (Rare)
Suggestion: How to make the Capra Demon boss fight easy
With the Bell Gargoyles defeated, you’ll want to start your journey to the second Bell Of Awakening. You’ll need to head into the underbelly of Lordran, starting with The Depths, which you need a key for that’s dropped by the Capra Demon.
Return to the dragon bridge and retrace your steps to the door you emerged from after defeating the Taurus Demon. Opposite it at the start of the bridge should be a locked door. With the Basement Key (Found at the Undead Parish near the church), you can unlock it and journey into Lower Undead Burg. Push through the area until you reach a fog door, starting the Capra Demon fight.
This boss battle is one of the hardest and most frustrating for new players since you need to defeat the Capra Demon and two dogs in a very small arena. The best way to defeat the Capra Demon is by performing plunging attacks rather than facing the enemy head-on. Once defeated, the Capra Demon will drop the Key To The Depths.
The Capra Demon can be skipped if you chose the Master Key at the start of the game, allowing you to head straight to Blighttown to fight Chaos Witch Quelaag and ring the Second Bell Of Awakening. However, you will lose out on many Souls and items in the process.
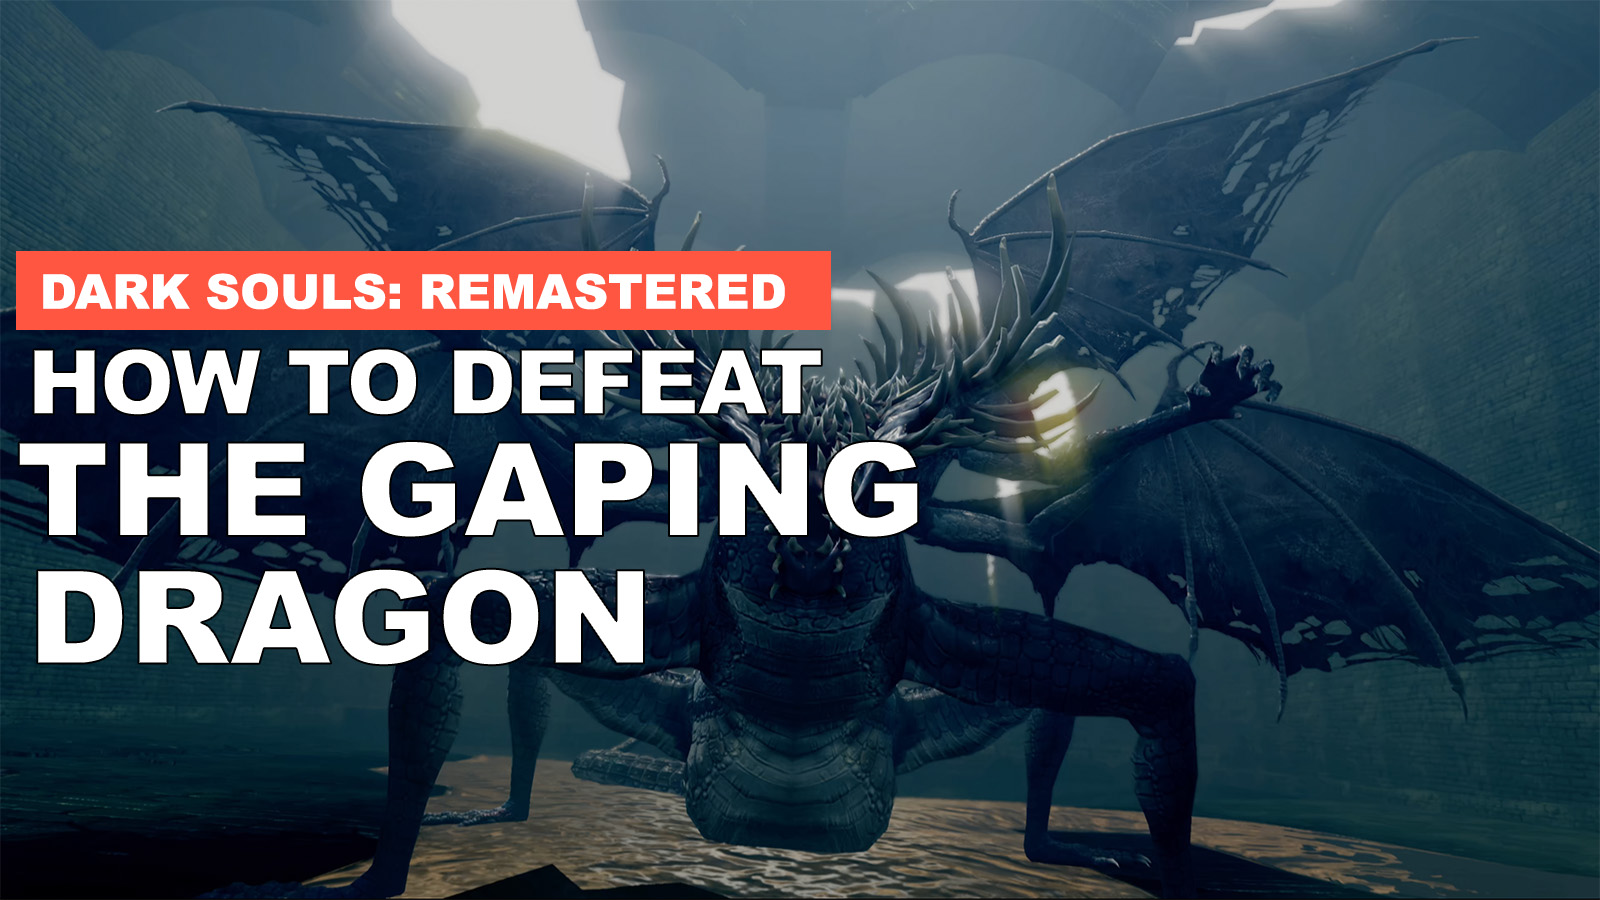
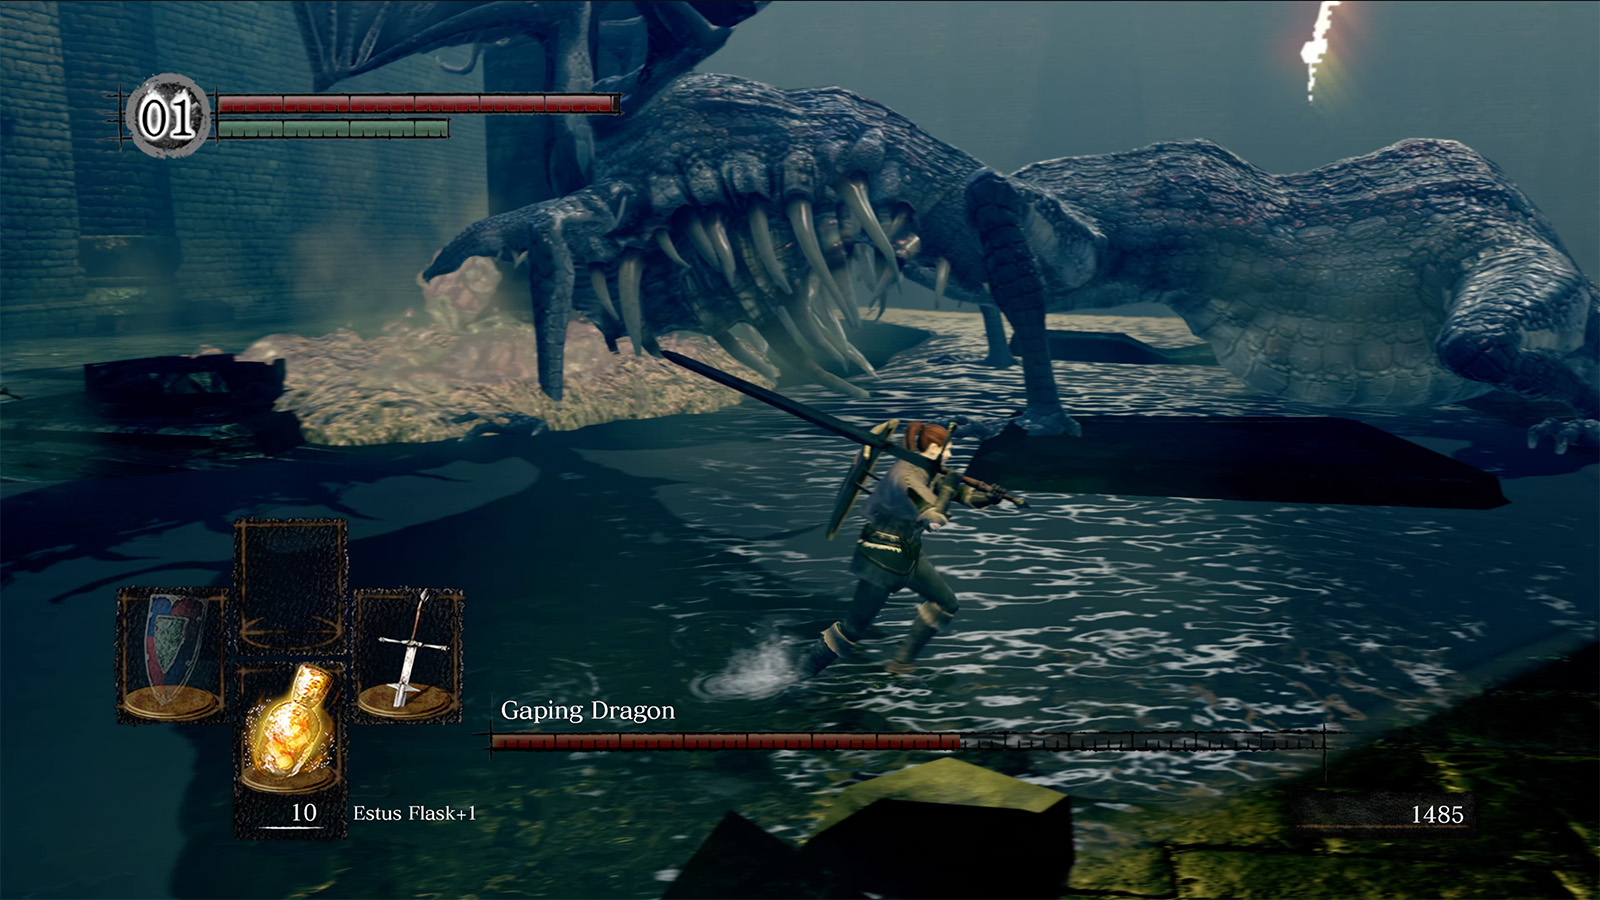
5. Gaping Dragon
Rewards:
• 25,000 Souls
• 1 Twin Humanity
• 1 Homeward Bone
• Blighttown Key
• Dragon King Greataxe (Cut off the tail)
Suggestion: The Gaping Dragon boss guide
With the Capra Demon defeated, you’re going to need to descend The Depths, taking on numerous Hollows, rats, mages, and more on your way. Eventually, you’ll reach a fog door that leads you to the Gaping Dragon boss fight. It’s a slow fight, as you’ll have to wait for the Dragon to perform its attacks and then deal damage to its sides whenever you have an opening. By defeating it, you’ll unlock the key to Blighttown, a very difficult area. Before heading there, you’ll want to return to Blacksmith Andre to level up weapons as it’ll be hard to return once you go deeper underground.
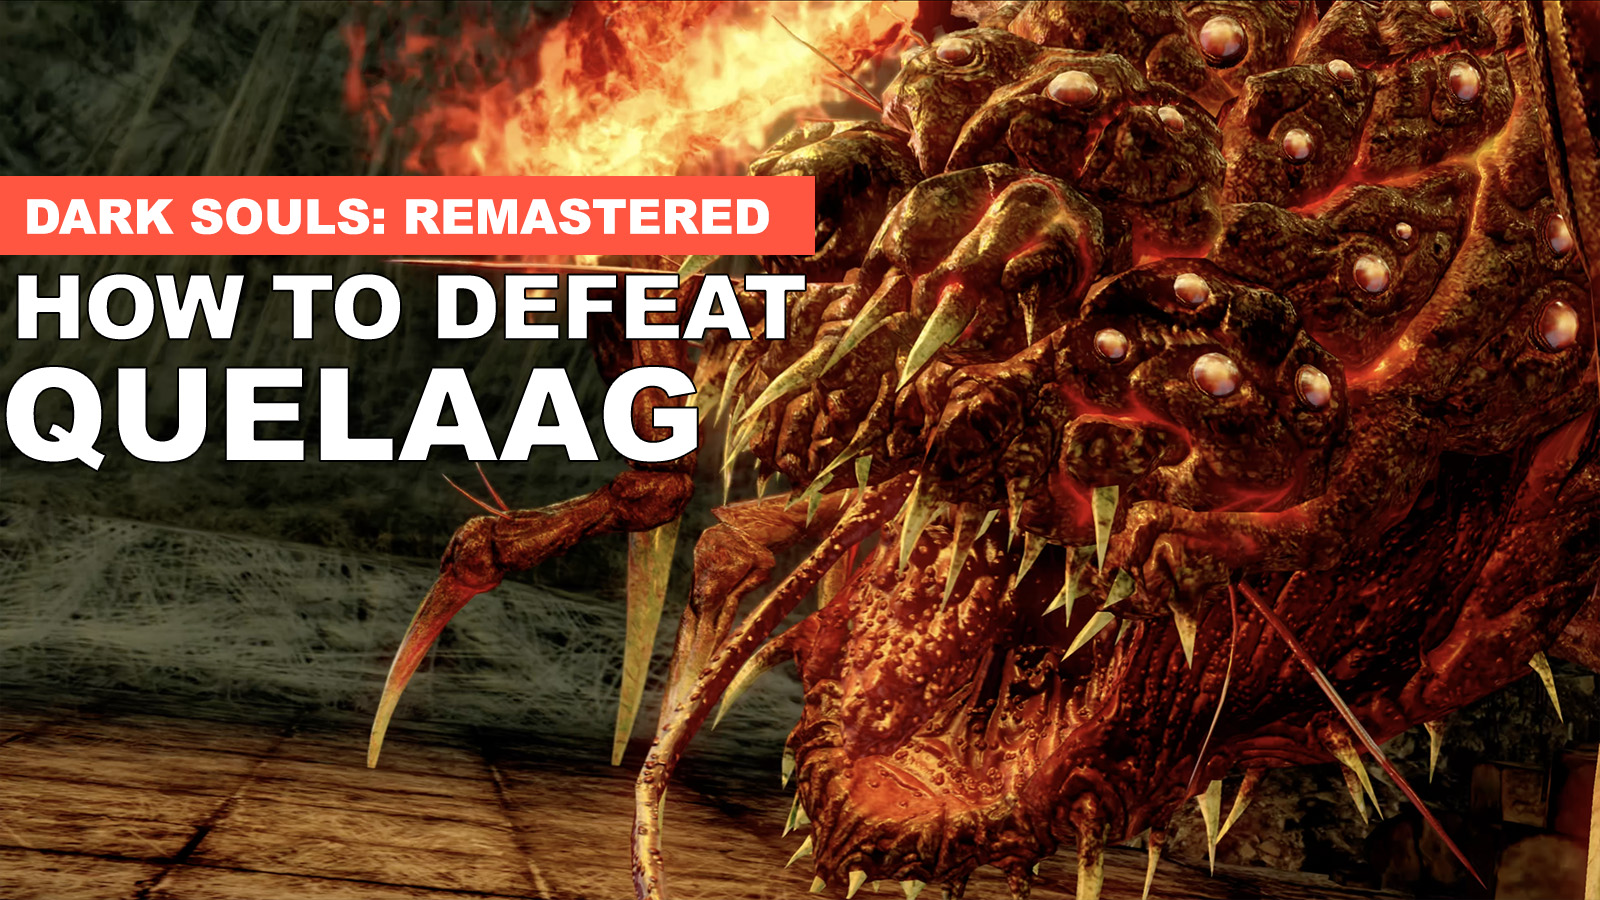
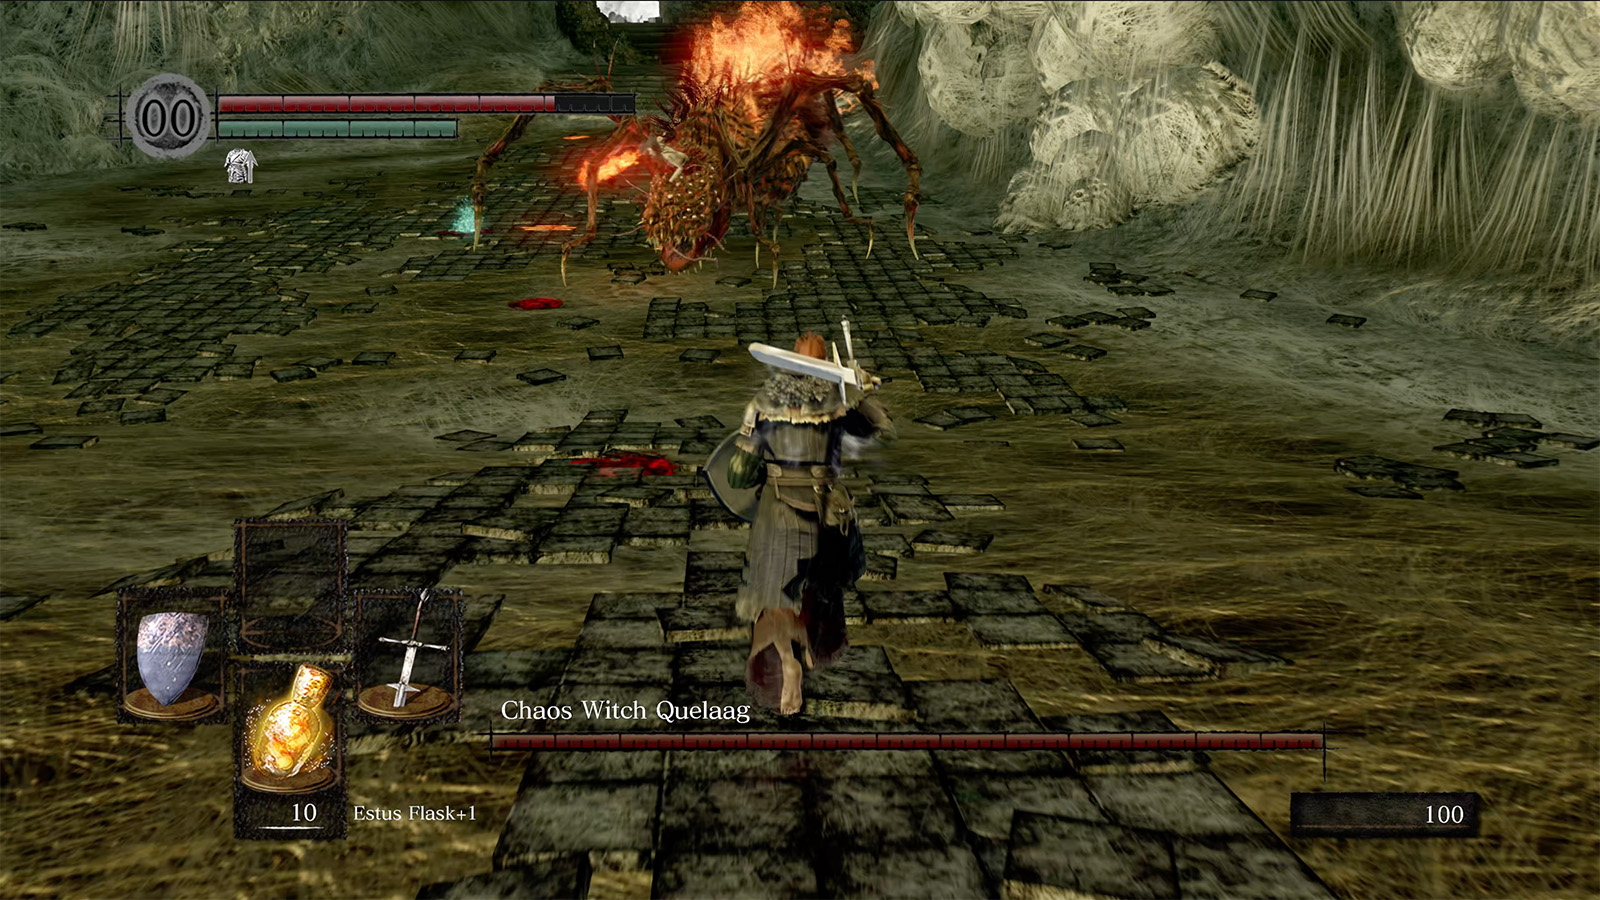
6. Chaos Witch Quelaag
Rewards:
• 20,000 Souls
• Soul Of Quelaag
• 1 Twin Humanity
Worth reading: How to defeat Quelaag
After descending the hellscape that is Blighttown, you’ll reach a poison swap that you’ll need to cross to reach Chaos Witch Quelaag, a half-spider, half-woman boss who guards the Second Bell Of Awakening. The fight can be tricky due to Quelaag’s fire-based attacks, as well as the poison you probably become inflicted with on the way to the boss fight. Taking your time and making note of her dangerous AOE attacks will help you succeed! Once she’s been defeated, ring the Second Bell and then make your way back out of Blighttown and towards Firelink Shrine via the Valley Of The Drakes – use the lifts to the left of the tunnel bonfire.
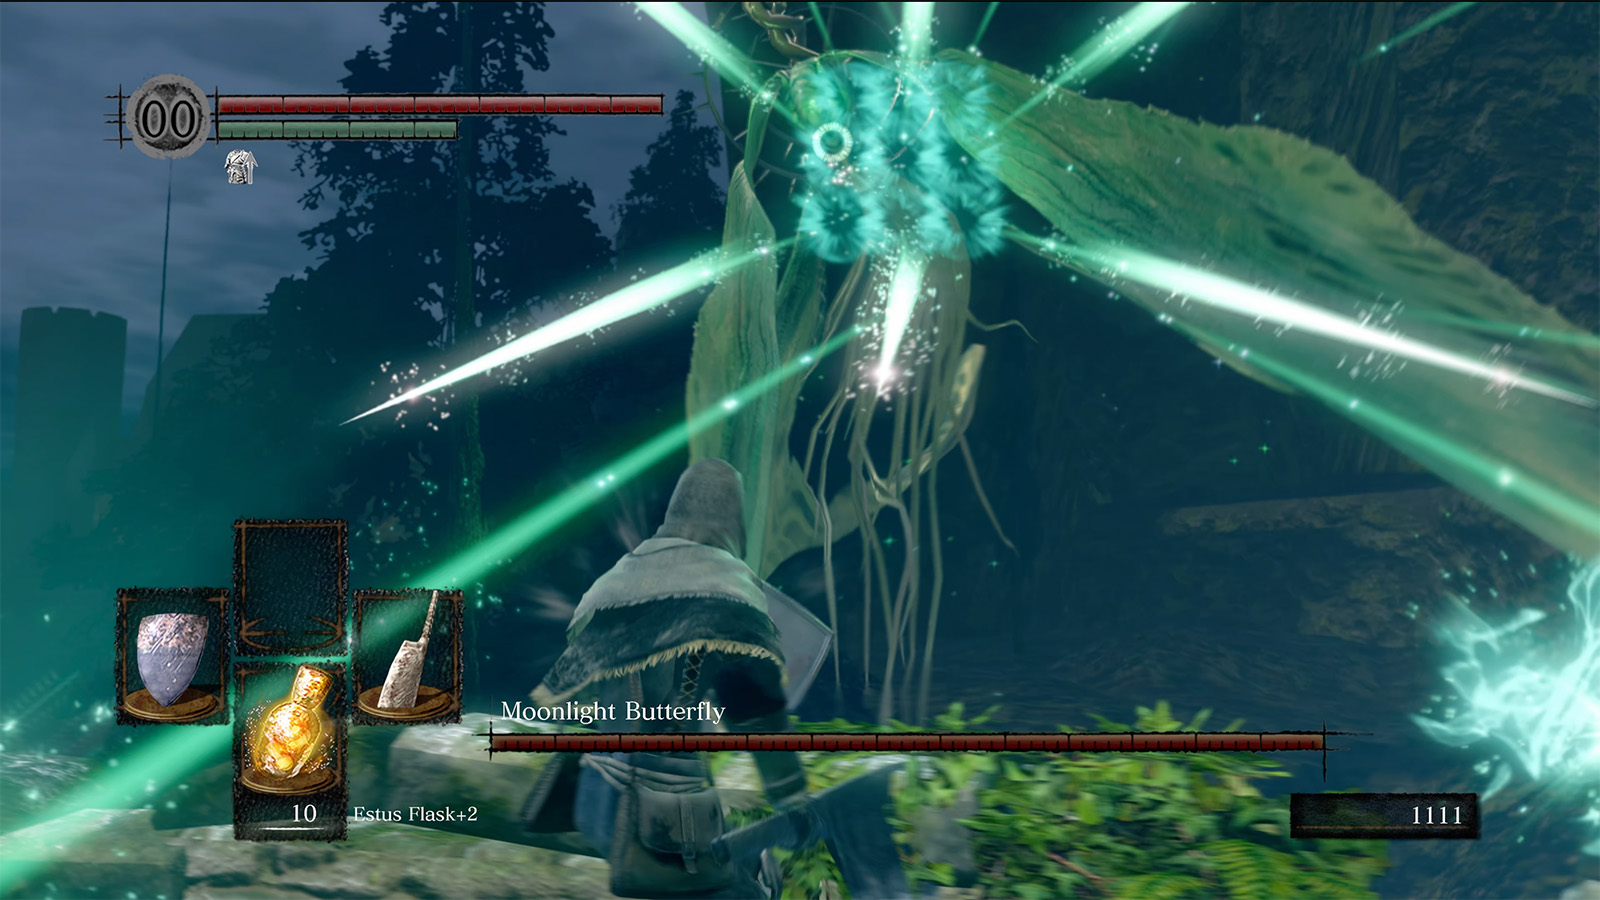
7. Moonlight Butterfly (Optional)
Rewards:
• 10,000 Souls
• Soul Of The Moonlight Butterfly
• 1 Humanity
• Blue Titanite Chunk (Rare)
• Blue Titanite Slab (Rare)
Guide: How to defeat the Moonlight Butterfly
Although you can defeat the Moonlight Butterfly earlier or skip it completely, I usually try to defeat the Butterfly around here as it’s close to the next mandatory area and should be relatively easy (And faster than if you do the fight earlier) if you’ve been levelling up your stats and weapon. Avoid its magic, wait for the Butterfly to drink nectar, and then attack it. Defeating the Moonlight Butterfly not only awards you with Souls, but it allows you to grab the Divine Ember, which is required to unlock all trophies and achievements and upgrade Divine weapons.
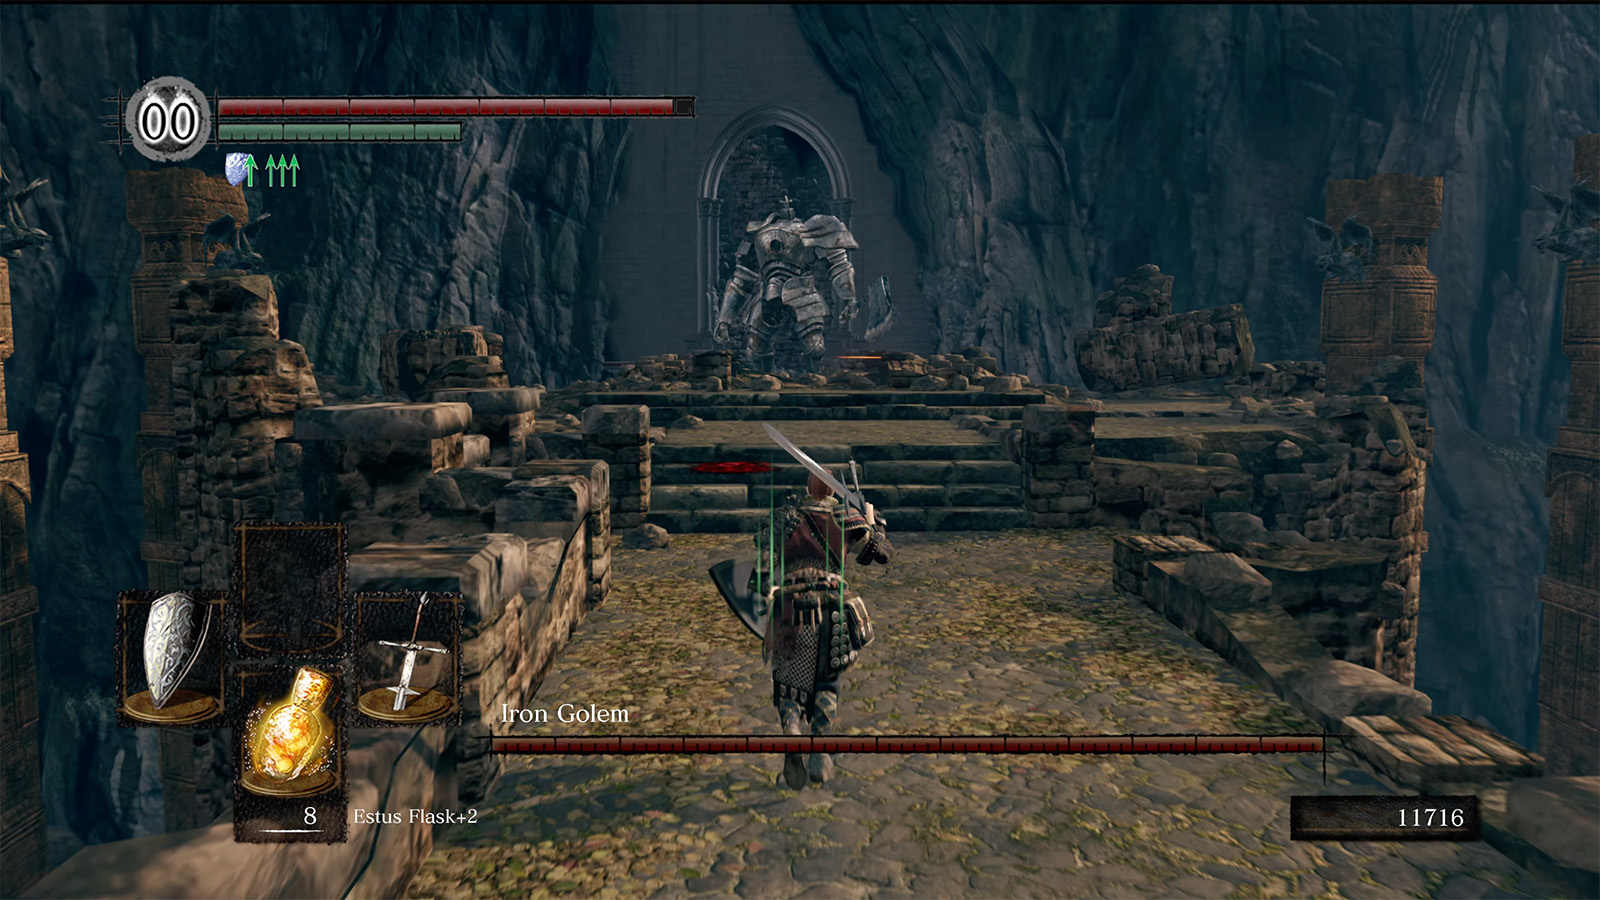
8. Iron Golem
Rewards:
• 40,000 Souls
• 1 Humanity
• Core Of An Iron Golem
Worth reading: How to quickly defeat the Iron Golem
With both Bells rung, you’re going to want to head towards Seth’s Fortress, a large building located across the bridge from the Blacksmith Andre bonfire. Before you go there, tie up any loose ends and upgrade your equipment, as it’ll be hard to return to Andre and other merchants for a bit. Make your way through the trap-filled hellhole and to the top of the Fortress, lighting the bonfire located just off the ledge and on a balcony beside a broken railing at one of the bombed scorch marks. Once you reach the top of Seth’s Fortress, you’ll come face-to-face with the Iron Golem, which you’ll need to defeat to access Anor Londo.
Before fighting him, make sure to defeat the bomb-throwing giant located at the top of the tower just beside the boss fog wall, as he’ll make the boss fight harder for you. Fast for his size, the Iron Golem hits hard. He’ll prioritise his axe, but he can also pound the ground with his fists or stomp his feet. Strike at his ankles by keeping between his legs. Doing it enough will cause him to fall over, giving you plenty of time to attack. If you do this close enough to the edge of the boss arena, there’s a chance he’ll fall off the platform and die.
9. Ornstein And Smough
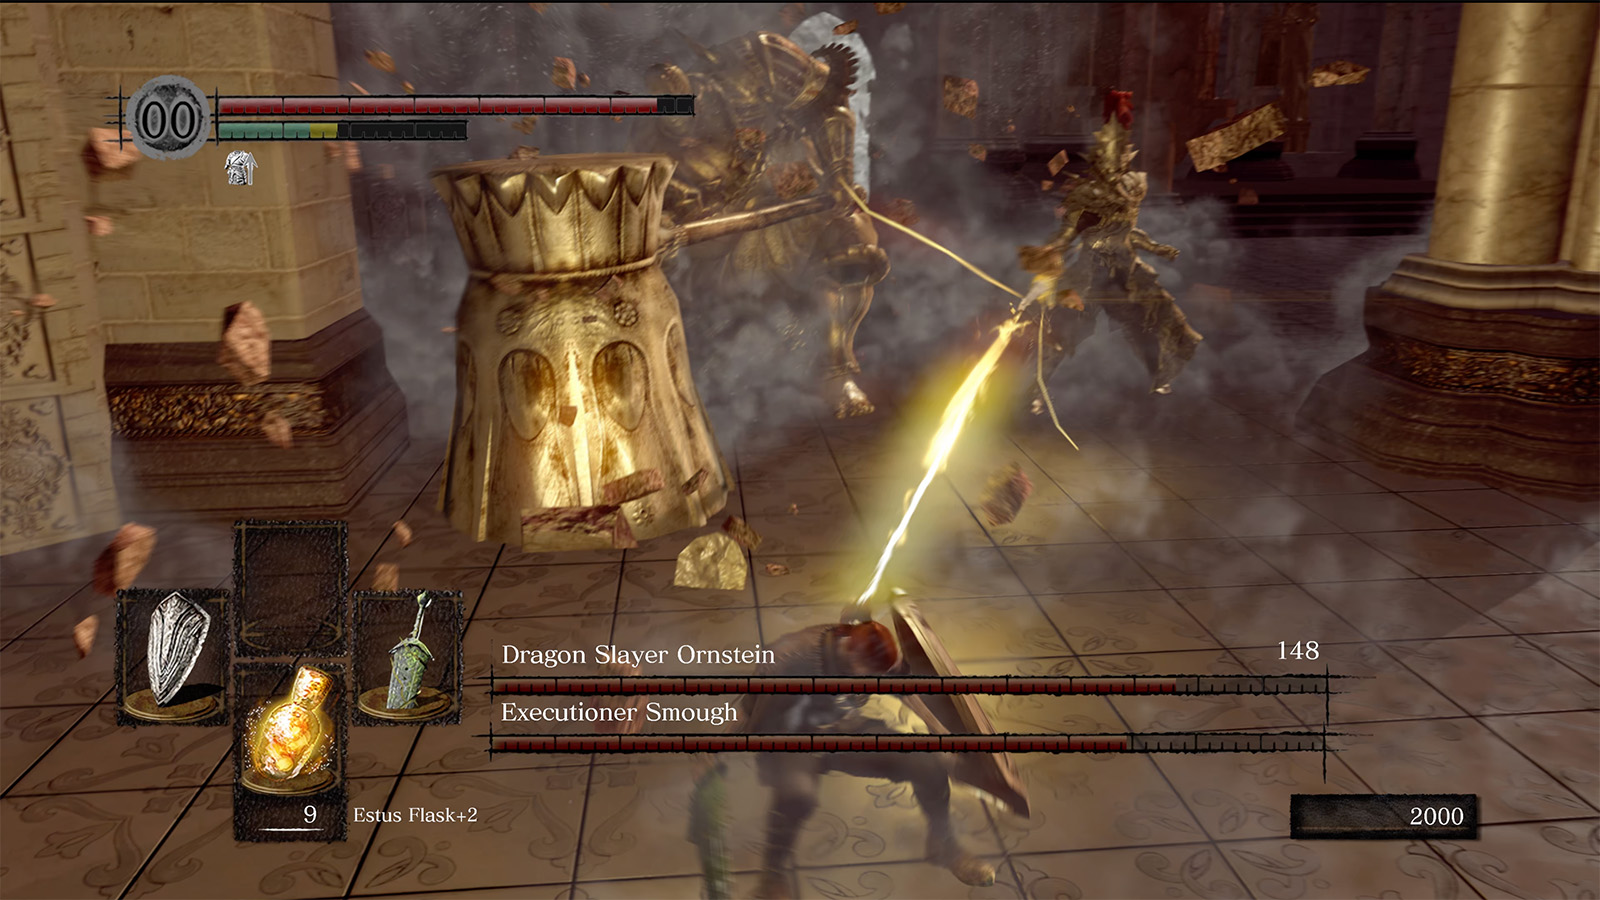
Rewards:
• 50,000 Souls (Both)
• Soul Of Ornstein / Smough
• Leo Ring (Ornstein)
• Purchasable Ornstein / Smough armour set (Both)
Suggestion: The best way to defeat Ornstein and Smouth
When you reach Anor Londo, you’ll need to make your way through the city towards a large cathedral where you’ll need to complete one of the game’s toughest boss fights: Ornstein and Smough. The duo boss fight requires patience, as you’ll have to evade both enemies while trying to deal damage. Depending on who you defeat first, the second phase of the fight will differ as well as the rewards for defeating them. Don’t be afraid to summon, and focus on attacking only when there are solid openings.
Once you’ve defeated Ornstein and Smough, you’ll have completed the first half of the game – congratulations! Speak with Princess Gwynevere by taking the lifts up a floor within the boss arena. You’ll acquire the Lordvessel from her, which unlocks fast travel to selected bonfires. With fast travel unlocked, you can pretty much go anywhere and do the remaining bosses as you want. However, the first thing you should do is head back to Firelink Shrine and speak with Kingseeker Frampt (He’s located at that pool of water near the bonfire!) to place it in Firelink Altar and start the second half of the game: a quest to collect four Lord Souls.
10. Stray Demon (Optional)
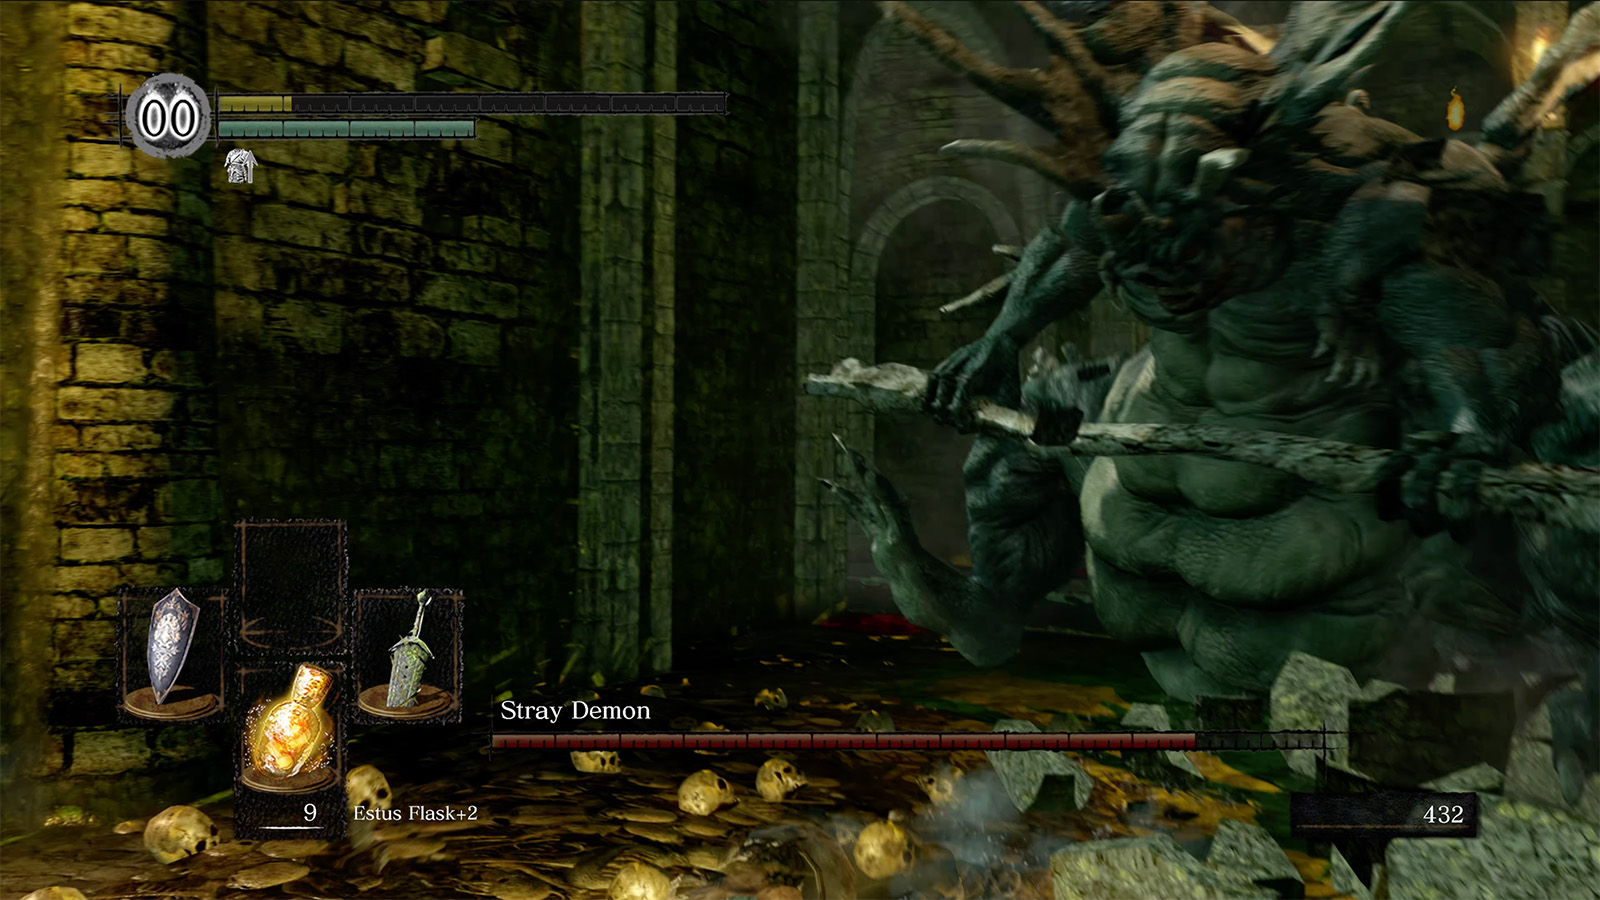
Rewards:
• 20,000 Souls
• 1 Humanity
• 1 Homeward Bone
Since you’re in Firelink Shrine, I like to take this time to head back to the Undead Asylum to defeat an optional boss and grab something that unlocks an optional area. To return to the area, take the lift towards Undead Parish but roll out of it when you see a platform. Follow it and perform a jump to the broken tower, and climb it to reach the crow’s nest, where you can “curl into a ball”. Wait long enough, a cutscene triggers where the crow takes you back.
The Undead Asylum is now filled with Hollows and Black Knights, as well as a Hollowed Oscar Of Astoria. If you head back to the hall where you fought the Asylum Demon, the floor will collapse into an arena with the Stray Demon (An identical Asylum Demon boss but with a new moveset). Skirt around the hall and head through the doors ahead to rest at the bonfire (If you die without doing this, you’ll respawn at Firelink Shrine!). Drop down into the Stray Demon’s arena and fight him. The demon uses similar attacks to the Asylum Demon, swinging his staff and pounding the ground, but its weapon can unleash an explosion which you’ll want to steer clear off or block with a shield.
Once you’ve defeated the Stray Demon, head back to the cell you first started the game in and defeat the Black Knight guarding it to get the Peculiar Doll, which allows you to enter the Painted World Of Ariamis. Don’t forget to explore the remainder of the Asylum for some additional goodies, many of which you may have spotted on your first visit but couldn’t otherwise get.
11. Pinwheel
Rewards:
• 15,000 Souls
• 1 Humanity
• Mask Of The Father, Child or Mother
• Rite Of Kindling
Return to Firelink Shrine, and head towards the cemetery to the back of the area, just past Kingseeker Frampt’s pool of water. Head through the Catacombs towards Pinwheel, a very easy boss that you could have attempted early on in the game. However, there are two reasons I like to fight Pinwheel later:
- Pinwheel can be frustrating to get to and if you defeat him without the Lordvessel, you can’t warp home and instead need to head back to Firelink Shrine manually, which can be annoying
- Defeating Pinwheel gives you the Rite Of Kindling, which allows you to kindle bonfires further up to 20 Estus Flasks, handy for the upcoming harder areas and bosses. You can clear the first half of the game with 10 estus flasks fine
So, for the above reasons, I like to quickly pop down into the Catacombs, past numerous necromancers and enchanted skeletons, and defeat Pinwheel with a few quick hits. From there, I usually warp back to my last rested-at bonfire via a Homeward Bone, and then fast travel back to Anor Londo to venture to the Painted World Of Ariamis and for the first of four Lord Souls.
12. Crossbreed Priscilla (Optional)
Rewards:
• 30,000 Souls
• 1 Twin Humanity
• Priscilla’s Dagger
• Soul Of Priscilla
Before you head into the Painted World Of Ariamis, know that its bonfires are cut off from all others, so you’re not able to fast travel out. Upgrade your weapon if possible and then head into the Anor Londo chapel that’s home to the gigantic painting and dozens of Painting Guardians. Approach it to trigger a cutscene that transports you into the painting and the Painted World Of Ariamis.
Make your way through the area and pick up all of its item upgrades, equipment, and weapons. When you reach the end, you can choose to fight Crossbreed Priscilla or not, as she’s friendly at first. I always do it for the Souls and the trophy or achievement. The fight is relatively simple, despite her being invisible. Just keep an eye on the ground, as you’ll see her footprints in the snow as she moves. You won’t see her attacks, so keep your shield up at all times and only lower it when you attack.
Jumping off the platform at the end of her boss arena sends you back to Anor Londo. DO NOT USE A HOMEWARD BONE as it’ll send you back to the Painted World. Fight off the Painting Guardians and return to the main Anor Londo bonfire protected by a firekeeper, it’s closer to Seath.
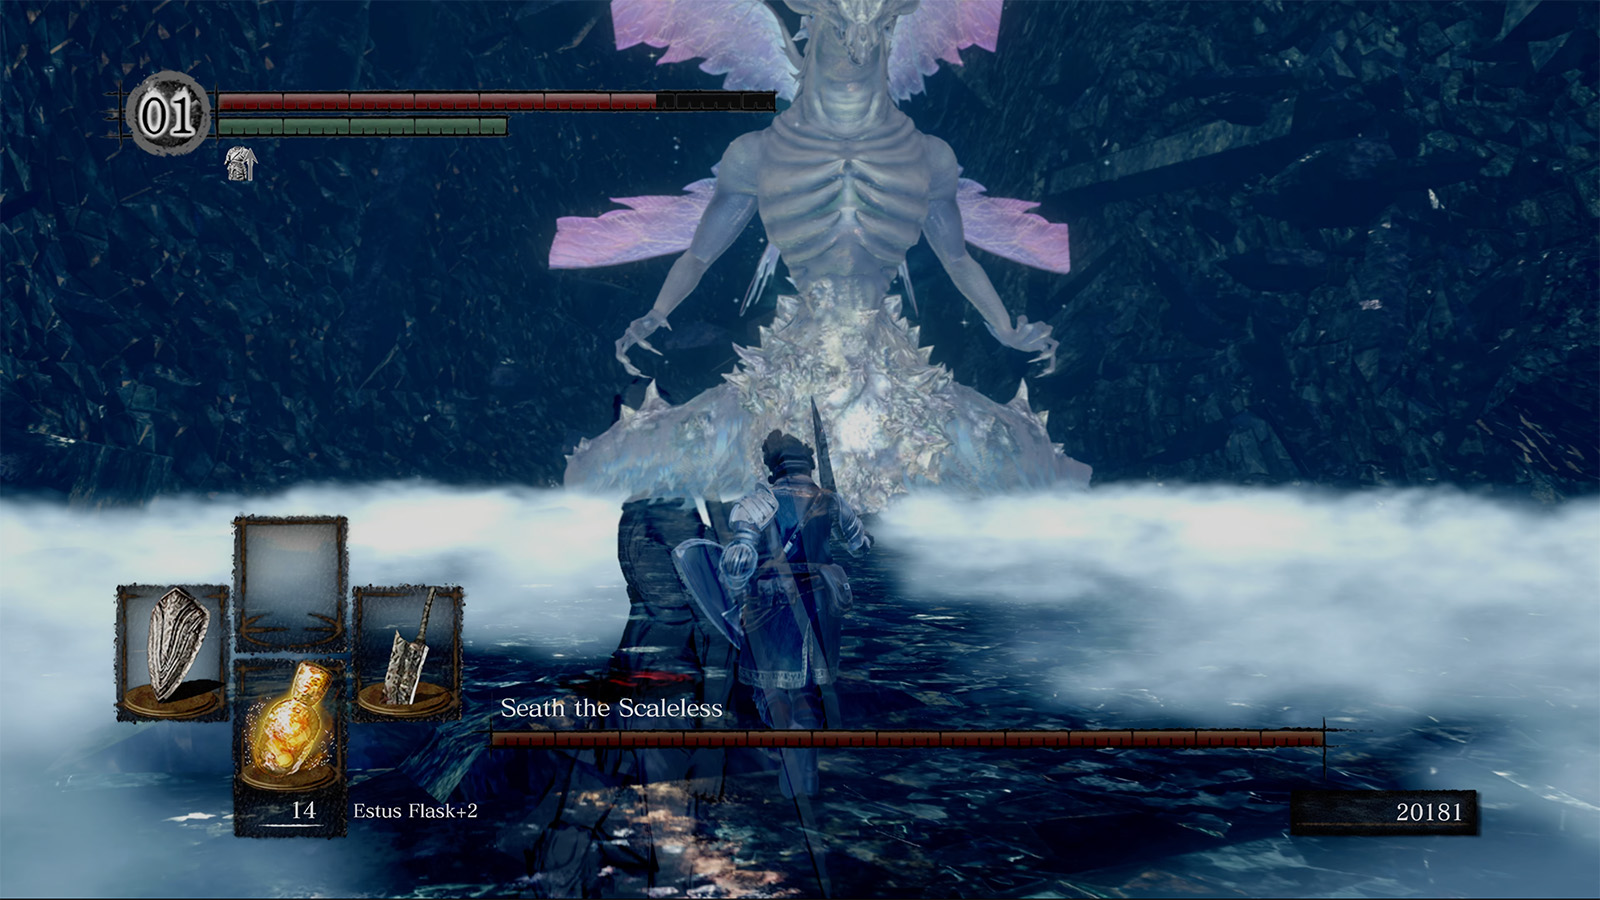
13. Seath The Scaleless (Lord Soul)
Rewards:
• 60,000 Souls
• 1 Humanity
• Bequeathed Lord Soul Shard
Exit the chamber of the Anor Londo bonfire and take a left. Pass the Sentinels and head up the staircase and hill towards a large archway which was previously blocked off by gold fog. Head through to enter The Duke’s Archives. There are two encounters with Seath here, the first of which will automatically kill you and transport you to a prison. The second is deep within the Crystal Caves, which you can only access by clearing The Duke’s Archives.
During the second encounter with Seath, you’ll need to smash the Primordial Crystal to end his immortality. Proceed to fight Seath by attacking his tails and body, avoiding his wide and deadly curse attacks. Once you’ve defeated Seath, you’ll acquire one of the four main Lord Souls needed for the game’s ending, and you can now make your way back to Princess Gwynevere in Anor Londo to finish an optional boss and complete the area.
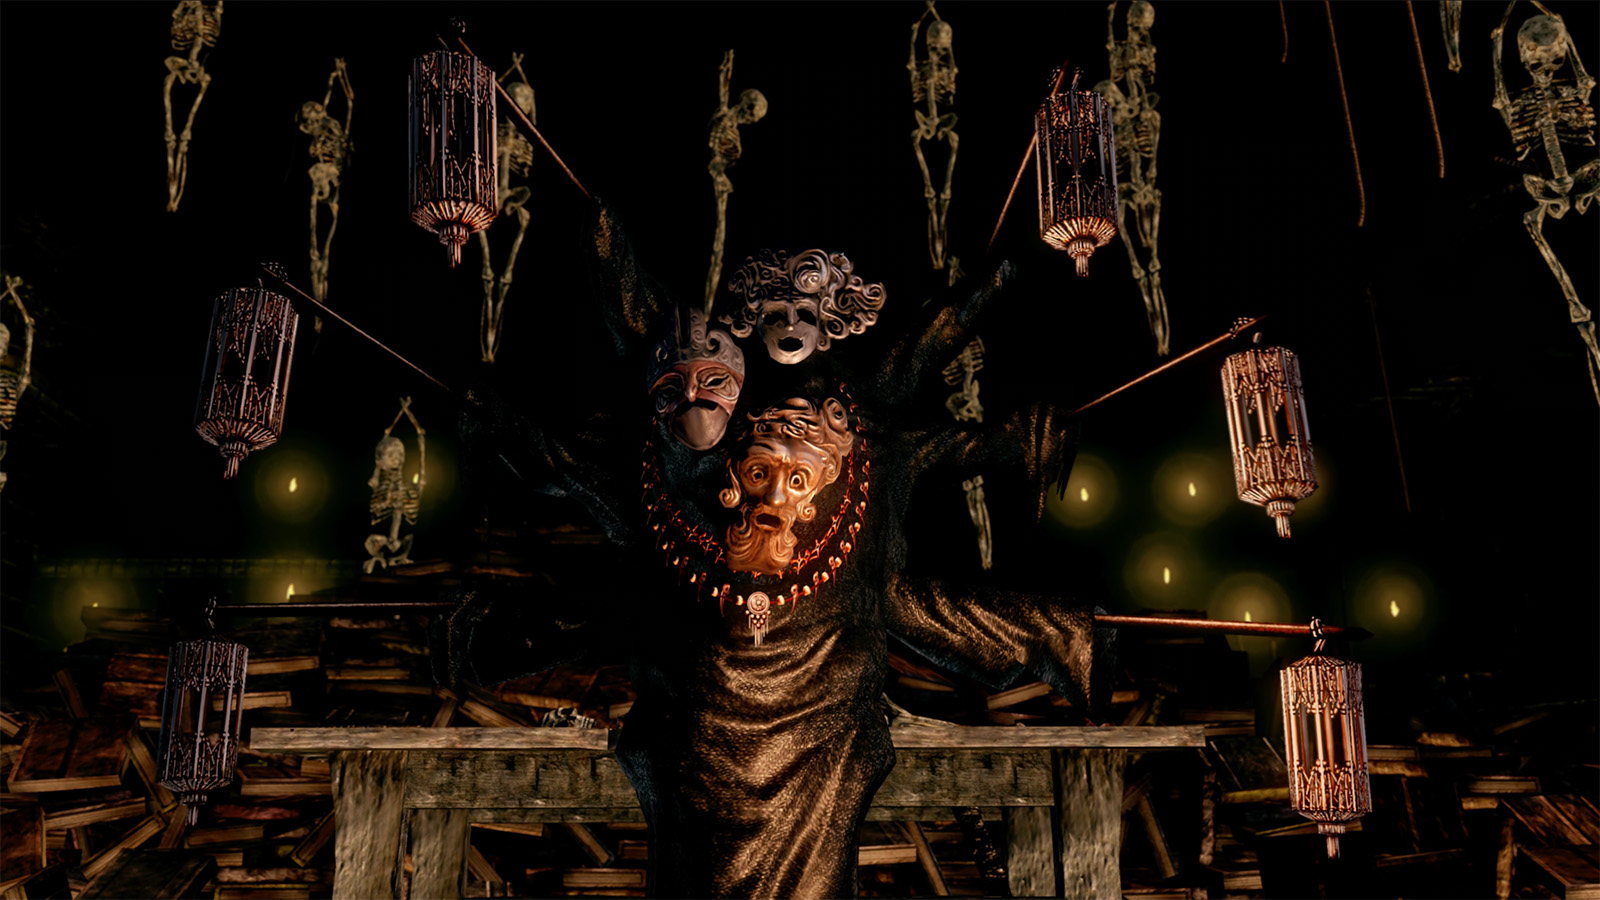
14. Dark Sun Gwyndolin (Optional)

Rewards:
• 40,000 Souls
• Soul Of Gwyndolin
It’s around this time I usually head back to Anor Londo to complete an optional boss fight. The easiest way to access this boss is by heading back to Princess Gwynevere and attacking her with a bow, revealing that she was actually an illusion created by Dark Sun Gwyndolin. Head through the cathedral of Anor Londo and defeat Gwyndolin’s followers, and then the Anor Londo fire keeper. After that, descend the spiral staircase outside of the Cathedral and into a tower with a bonfire.
Warning: Attacking Gwynevere and killing the Fire Keeper blows out the Anor Londo main bonfire, although it’s still available for fast travel
If you continue through, you’ll trigger the Dark Sun Gwyndolin, which can be a time-consuming and annoying fight. The encounter takes place in an endless hallway with Gwyndolin at the back. You’ll need to avoid their attacks (Magic resistant armour is very helpful here!) and run close enough to land some hits before they teleport further down the hallway. If you fail to deal enough damage quickly, the fight can drag on, which is why I like to be a little overpowered for the battle. Once you’ve defeated Gwyndolin, loot the chests at the end of the hallway for some goodies. After that, it’s time to head towards your next Lord Soul.
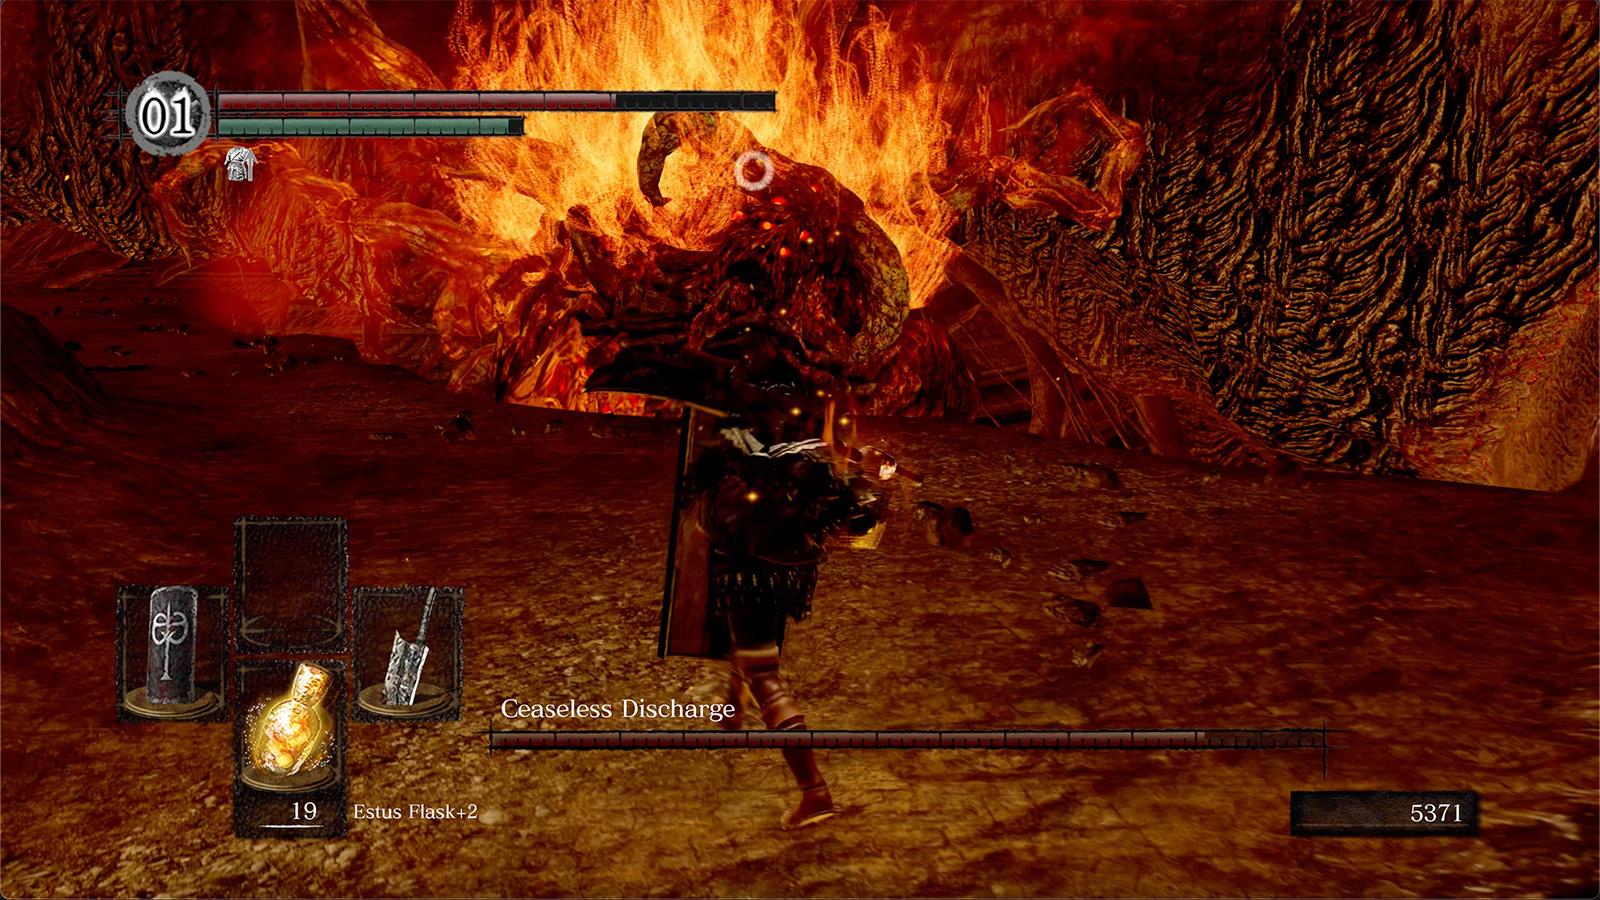
15. Ceaseless Discharge
Rewards:
• 20,000 Souls
• 1 Humanity
• 1 Homeward Bone
Warp to Quelaag’s Domain and head down into the Demon Ruins, beginning your journey to Bed Of Chaos. Cross the bridge on your right over the valley of lava and enter the nearby fog door. Ceaseless Discharge doesn’t appear immediately, so follow the area through and pick-up the Gold-Hemmed Black Set at the end of the path, triggering the boss who springs up from the lava. Since he uses fire-based attacks, you’ll want to wear something with high fire resistance (The Gold-Hemmed Black set is actually great for this!). Run back to the fog door, healing if you can’t avoid the boss’ attacks.
Near the door, you can bait his fist slam attacks, which should allow you to unleash some attacks. When you defeat him, the lava within the area will drain, allowing you to venture further into the Demon Ruins.
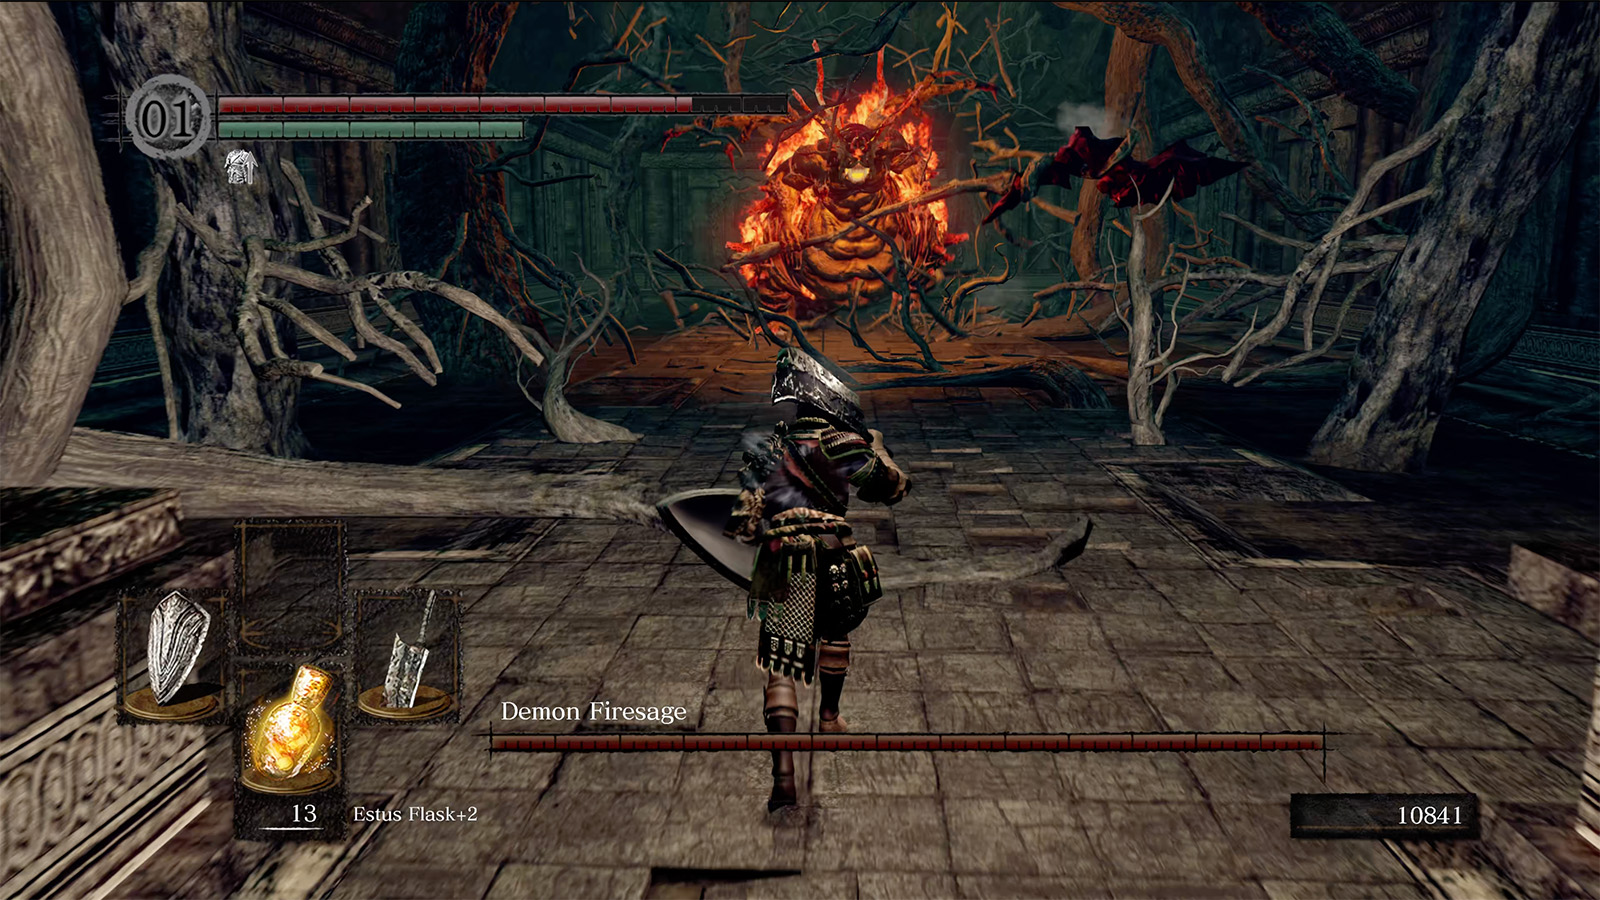
16. Demon Firesage
Rewards:
• 20,000 Souls
• 1 Humanity
• Demon’s Catalyst (Rare)
Demon Firesage is the next boss in Demon Ruins. Found within a large hall just beyond the stone steps that had previously been covered with lava, Demon Firesage looks and functions like the Stray Demon, just with fire-based attacks. He uses the same animations, so utilise the same tactics you did for the Stray Demon. Once he’s been defeated, you can light a nearby bonfire, which should make exploring the rest of the area a little easier.
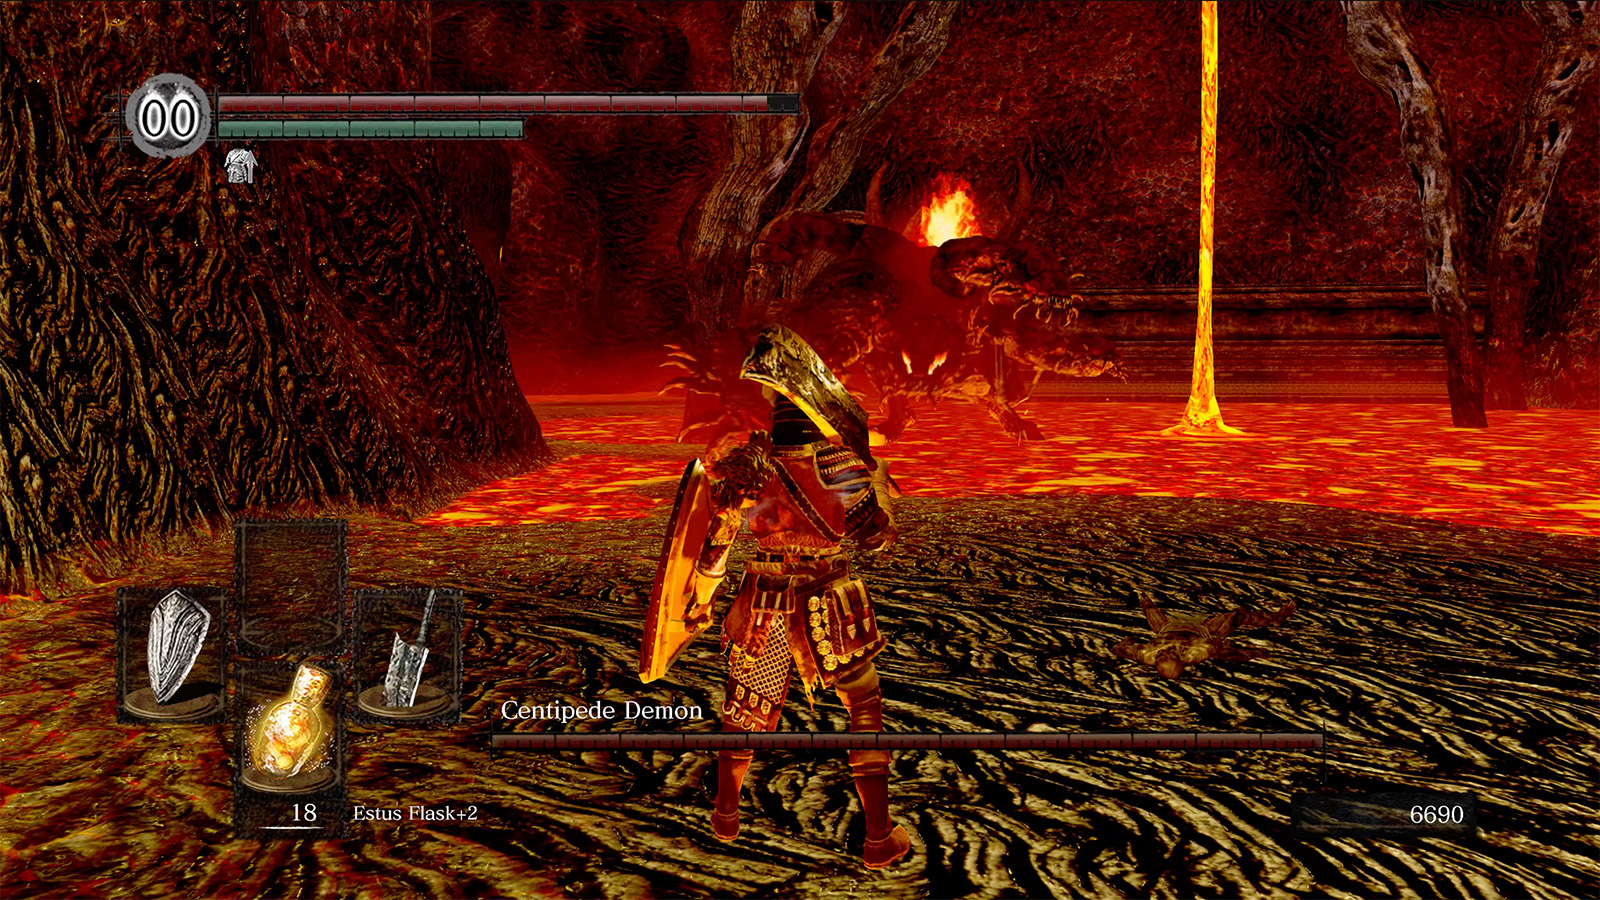
17. Centipede Demon
Rewards:
• 40,000 Souls
• 1 Humanity
• 1 Homeward Bone
• Orange Charred Ring
Descending further into the depths of the Demon Ruins sees you emerge into a large area filled with lava and a few safe platforms and trigger the Centipede Demon. When you enter this boss arena, immediately take a right and jump over the lava into a nook with a large open space where you can fight the Centipede Demon. The Centipede Demon is erratic, performs a lot of swing and slam attacks, and can grab you for a deadly attack. You’ll want to try and stay under the boss and avoid attacking its tail, as doing so unleashes its tail, which acts as a secondary enemy.
Once you’ve defeated the Centipede Demon, you’ll get the Orange Charred Ring, which reduces damage received from lava so you can finally walk over it – it can be used to grab the items situated over lava at the beginning of the Demon Ruins. Also with the ring, you can cross the giant pool of lava in the boss arena to enter Lost Izalith, which is home to the region’s final boss.
18. The Bed Of Chaos (Lord Soul)

Rewards:
• 60,000 Souls
• 1 Humanity
• Lord’s Soul
After making your way through Lost Izalith and defeating the various demons and invasions, you’ll reach a fog door with a ramp you can slide down that drops you into the Bed Of Chaos boss arena. This isn’t so much of a fight and more of a puzzle. What you need to do is avoid the enemy’s attacks and make your way to the orange glowing orbs on either side of the arena to attack the orange root. When you destroy one, the boss will become more aggressive and the floor will begin to crumble. If you die, you can return to the boss with your progressive saved: you do not need to destroy the roots again if you die.
After destroying both roots, perform a running jump onto the platform at the middle of the boss to access a small tunnel with numerous roots. At the end is an insect which you must hit to defeat the boss, reveal a bonfire, and acquire the second of four Lord Souls.
19. Great Grey Wolf Sif

Rewards:
• 40,000 Souls
• 1 Humanity
• 1 Homeward Bone
• Covenant Of Artorias
• Soul Of Sif
With Anor Londo and the Demon regions complete, you can start setting yourself up for your next Lord Soul. Head back to Darkroot Garden to where the Hydra can be found. Skirt around the left-side of the arena and take a ladder up beside a waterfall. Progress through the remainder of the area to reach a graveyard, which is home to Artorias The Abysswalker’s grave. Reaching the grave triggers a cutscene where you’re ambushed by Artorias’ partner Sif, who you’ll need to defeat for the Covenant Of Artorias ring, which will allow you to enter the Abyss and defeat the boss with the fourth and final Lord Soul.
Great Grey Wolf Sif isn’t a difficult fight, as the wolf will generally spend her time swinging the oversized sword, but she can also perform some charged attacks and backflips. You’ll want to stay under Sif and block attacks if you have the stamina to do so, since most of them are chained. Doing enough damage will cause Sif to begin limping, slowing her down and allowing you to perform the final few blows.
20. Gravelord Nito (Lord Soul)

Rewards:
• 60,000 Souls
• 1 Humanity
• Lord Soul
Once you’ve done grabbed the Artorias ring, it’s time to head through Tomb Of Giants to defeat your next Lord Soul boss: Gravelord Nito. Before you head here, make sure you’ve either acquired the Sunlight Maggot head piece or the Skull Lantern, as the Tomb Of Giants is pitch black and you’ll be unable to see without these items. Warp to any available bonfire within either The Catacombs or Tomb Of Giants, and proceed through the latter area. After emerging into what looks like some side cliffs over water, you should find a hole in a cave wall, which, when you enter, is filled with Pinwheel clones. Head through the area and through a fog door for a pit to drop into, triggering the Gravelord Nito boss encounter.
Gravelord Nito can be a tough fight, which is why I like to save him closer to the end. If you’re ill-equipped or just don’t have much health or stamina, you can die easily. There are several skeletons located within Nito’s boss arena and moving too much will trigger them. So stay relatively close to the arena’s entrance and wait for Nito to reach you. Fight him carefully, making note of his toxic-based attacks, and defeat the reviving skeletons whenever you can. Thankfully, Nito is relatively slow and is weak to fire, so use that to your advantage to defeat him.
21. Four Kings (Lord Soul)

Rewards:
• 60,000 Souls
• 4 Humanity
• Bequeathed Lord Soul Shard
With the Covenant Of Artorias ring in your possession, you’re going to want to head down to New Londo Ruins and fight your way through ghosts, Darkwraiths, and other ungodly abominations to reach the Four Kings, the final boss with a Lord Soul. To do this, make your way to a deep tower which you’ll need to drop into with the Artorias ring equipped (If you don’t have it on or remove it during the fight, you’ll die). When you drop into the Abyss, one of the Kings will spawn, and a new one up to a maximum of five will appear every 45 seconds.
The fight against the Four Kings boss can be challenging if you’ve failed to create a solid build that deals good damage. The key to surviving this fight is to defeat each King as quickly as possible so you don’t have to juggle multiple enemies, and to use the short breaks between to heal. They deal a lot of damage, thanks to their magic-based attacks, and the disorientation that comes with fighting them in the Abyss. The fight isn’t impossible though, and once defeated, you can head to Firelink Shrine to deposit the souls into the Lordvessel and unlock the door to the game’s final area: the Kiln Of The First Flame. Before heading in, you might want to complete the game’s DLC!
22. Sanctuary Guardian (DLC)

Rewards:
• 30,000 Souls
• 1 Humanity
• Guardian Tail (Rare)
• Guardian Soul
Sanctuary Guardian is the first boss within the Artorias Of The Abyss DLC, which you can access by interacting with the portal in Darkroot Basin. Guarding Oolacile Sanctuary, the Sanctuary Guardian marks Dark Souls’ departure from slow, methodical bosses to fast-paced fights. Despite his size, the Sanctuary Guardian, a manticore, is fast and can perform chains of attacks that quickly deplete your stamina and leave you open for attacks. He hits hard and staggers a lot, so you’ll need to prioritise dodging to get through this. Once defeated, you can progress through to Oolacile Sanctuary and start the DLC proper.
23. Knight Artorias (DLC)

Rewards:
• 25,000 Souls
• Soul Of Artorias
After progressing through much of the DLC, you’ll eventually come across a colosseum, where Knight Artorias The Abysswalker is fought. Like the Sanctuary Guardian, Artorias is fast and hits hard, and he can perform a radical attack that gives him a damage buff. You’re again going to want to prioritise dodging his attacks and retaliating when you have windows, and there aren’t a lot of them. Take your time and keep dodging. Defeating him unlocks Oolacile Township.
24. Manus, Father Of The Abyss (DLC)

Rewards:
• 60,000 Souls
• 10 Humanity
• Soul Of Manus
The final mandatory boss in the Artorias Of The Abyss DLC is Manus, Father Of The Abyss, one of the hardest bosses in Dark Souls. Located deep within the Chasm Of The Abyss, the demon-like Manus hits very hard, has insane reach, and can perform a series of chained attacks that can quickly kill you. The boss gives you almost no time to heal since he’s so fast, but constantly backtracking away from him and baiting his hand slams gives you small attack or healing windows.
He also uses dark magic attacks, which you’ll want to use the Silver Pendant against, as it reflects all dark magic if used at the right time. Like Artorias, patience is key here, as well as multiple attempts. Although he isn’t weak to anything, you can summon Sif to assist you if needed. Once defeated, you’ll have completed all mandatory DLC bosses.
25. Black Dragon Kalameet (Optional, DLC)

Rewards:
• 60,000 Souls
• Obsidian Greatsword (Rare)
• Calamity Ring
Black Dragon Kalameet is an optional boss in the Artorias Of The Abyss DLC. The dragon can only be fought after encountering him in the Royal Wood and in his boss arena at the Royal Woods (He can kill you quickly here), and speaking with Hawkeye Gough who shoots him down so you can fight him in his arena. As with all other DLC bosses, Kalameet is fast. He utilises several fire-based attacks and when close likes to perform stabs, sweeps, and stomps with his body.
He can also perform a magical attack that inflicts a debuff on you where you receive twice as much damage from his attacks. Again, I’ll reiterate that you’re going to need to take the fight slowly and only when Kalameet provides you with windows to attack, such as when he’s breathing fire (You can run in and attack!). Summoning other players can be very helpful as they serve as distractions, so don’t be afraid to do that! You don’t need to defeat Kalameet to complete the DLC, but he drops some good Souls, a unique ring, and a great weapon if you can cut his tail.
26. Gwyn, Lord Of Cinder (Final Boss)

Rewards:
• 70,000 Souls
• Soul Gwyn, Lord Of Cinder
Gywn, Lord Of Cinder is the final boss in Dark Souls 1. Located at the end of the Kiln Of The First Flame, past several Black Knights, Gwyn is a fast and relentless boss that attacks with his fire sword. Most of his attacks are sword slashes, but he can grab you and blow you up. He likes to jump across the arena, so healing is next to impossible during the fight.
The best way to defeat Gwyn is by parrying his sword slashes with a good shield, allowing you to perform a critical attack. A few of these will quickly kill him, allowing you to either light or abandon the First Flame. If you struggle with parrying, use the environment to your advantage for healing and block and dodge as many attacks, keeping an eye on your stamina.
That’s it! By defeating all of the above bosses, you’ll have completed Dark Souls Remastered. From there, you can start New Game+, where enemies and bosses have higher damage, or you can start a fresh game with a different build or try any of the other Souls-like games. I hope this guide helped you, let me know if you agree with my boss order or think some encounter should be moved around.